

WordPress uses predictable login addresses. The familiar /wp-login.php endpoint and /wp-admin/ path make the login area easy to identify.
You can hide the default WordPress login URL by replacing the familiar login path with a custom URL. All In One Login lets you change the login URL from the WordPress dashboard, while developers can build a custom login entry point when they need a code-based solution.
But changing the login URL doesn’t secure WordPress on its own. It only changes how users reach the login process, so you should pair it with strong passwords, two-factor authentication, login attempt limits, and other security controls.
This guide covers two practical methods, explains what actually happens to /wp-admin/ and /wp-login.php, and shows what to do if you lose access after changing your login URL.
What Is the Default WordPress Admin URL?
A standard WordPress installation uses /wp-login.php as its login endpoint and /wp-admin/ for the administration area. When a logged-out visitor opens /wp-admin/, WordPress normally sends that visitor to the login process.
For example, a typical site might use:
- https://example.com/wp-login.php
- https://example.com/wp-admin/
These paths follow common WordPress conventions. Anyone familiar with WordPress can recognize them.
The two URLs also serve different purposes. /wp-login.php handles the login process, while /wp-admin/ points to the administration area that authenticated users manage.
So, when someone searches for how to hide wp-admin in WordPress, they usually mean changing or restricting the public login route rather than physically renaming the /wp-admin/ directory.
Changing a login URL doesn’t move the WordPress dashboard itself. Logged-in administrators still use /wp-admin/ to manage the website.
Why You Should Hide Your WordPress Admin URL
Changing the default login URL can reduce automated requests that specifically target the familiar WordPress login endpoint.
It isn’t a complete security measure.
WordPress’s current security guidance treats login URL obscurity as a secondary measure rather than a primary security control. It recommends layered defenses such as strong passwords, two-factor authentication, passkeys, rate limiting, CAPTCHA or Turnstile, XML-RPC protection, software updates, and monitoring.
A custom login URL can therefore form one layer of your WordPress login security setup.
For example, you can combine it with:
- Strong, unique administrator passwords
- Two-factor authentication
- Login attempt limits
- CAPTCHA or bot protection
- Failed-login monitoring
- IP or user blocking when appropriate
- Regular WordPress, theme, and plugin updates
- A web application firewall where appropriate
- XML-RPC protection when appropriate
- Passkeys or WebAuthn where supported
Protect XML-RPC when needed. Changing the login URL doesn’t automatically protect other authentication surfaces such as xmlrpc.php. If your site doesn’t need XML-RPC, consider disabling it. If you rely on it for specific services, use appropriate access controls and rate limiting.
Consider passkeys. Passkeys use WebAuthn-based authentication and can provide a phishing-resistant alternative to traditional passwords. They add another layer of protection beyond the login URL itself.
All In One Login brings several of these controls together. Its feature set includes changing the WP Admin URL, limiting login attempts, monitoring failed and lockout activity, and managing user or IP access.
Before You Hide wp-admin: Quick Checklist
Take a few minutes before changing your login path.
Back up your website. Keep a recent backup of your files and database so you have a recovery option if something goes wrong.
Choose a unique login path. Don’t replace wp-admin with another obvious word such as login if your goal is to move away from predictable naming.
Save the new URL. Put it in your password manager. Forgetting a custom login path can turn a simple security change into a frustrating recovery task.
Keep hosting access available. Make sure you can reach your hosting control panel, file manager, FTP, or SFTP if you need to troubleshoot the login configuration.
Test from a private window. Your existing browser session can hide problems because you’re already authenticated.
Test password recovery. A login URL change shouldn’t leave you without a working way to recover an account.
Once you’ve checked these items, you can change the login URL.
Method 1: Hide WordPress Admin URL With All In One Login
If you’re looking for a plugin to hide wp-admin, All In One Login provides a dedicated Change WP Admin Login URL feature that lets you manage the custom login path from the WordPress dashboard.
You don’t need to rename WordPress core files. You also don’t need to maintain a copied version of wp-login.php. But you can create a unique custom login URL and configure what happens when someone requests the old /wp-admin/ URL.
Step 1: Install and Activate All In One Login
- Go to Plugins → Add Plugin.
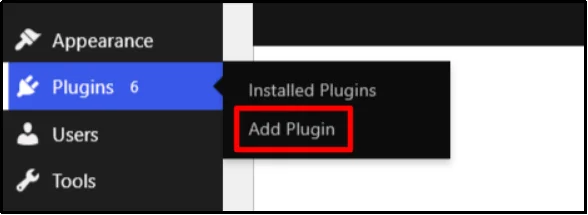
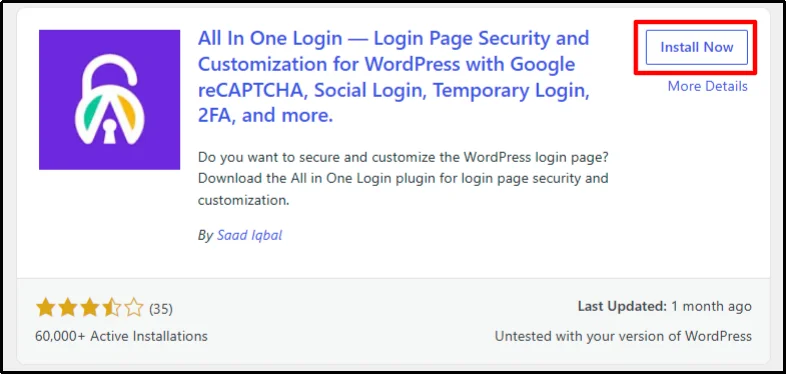
- Enter All in One Login in the search bar.

- Click on Install Now, then Activate.
Step 2: Enable Change WP-Admin Login URL and Enter Your Custom URL
- Either click on All In One Login or go to All In One Login → Dashboard.
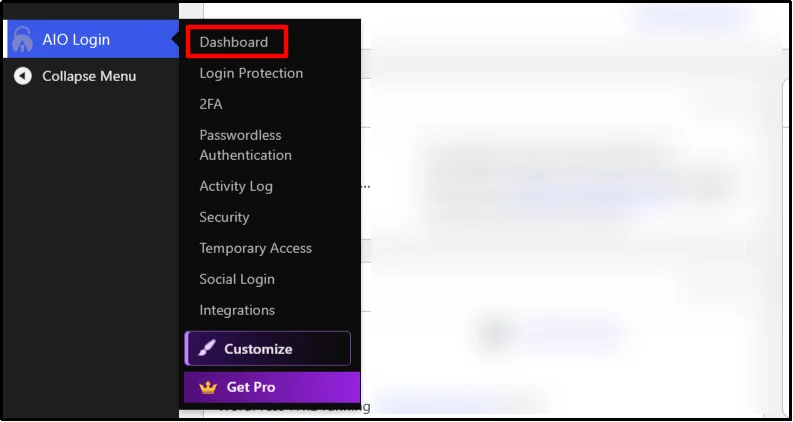
- Under Custom Login URL, click on Configure.
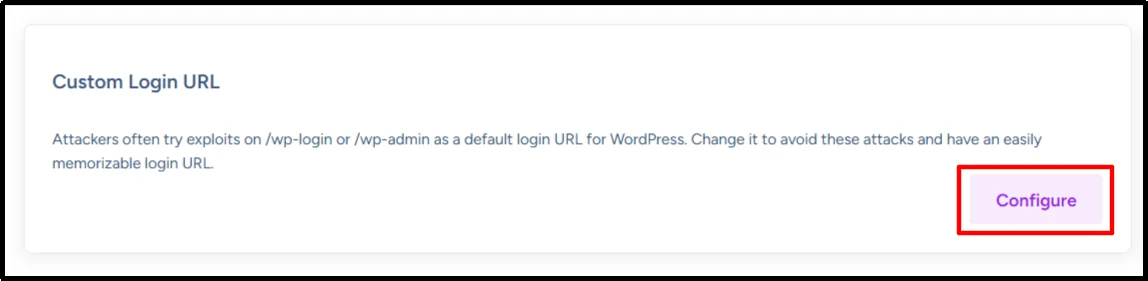
- Click on Enable to change the wp-admin login URL.
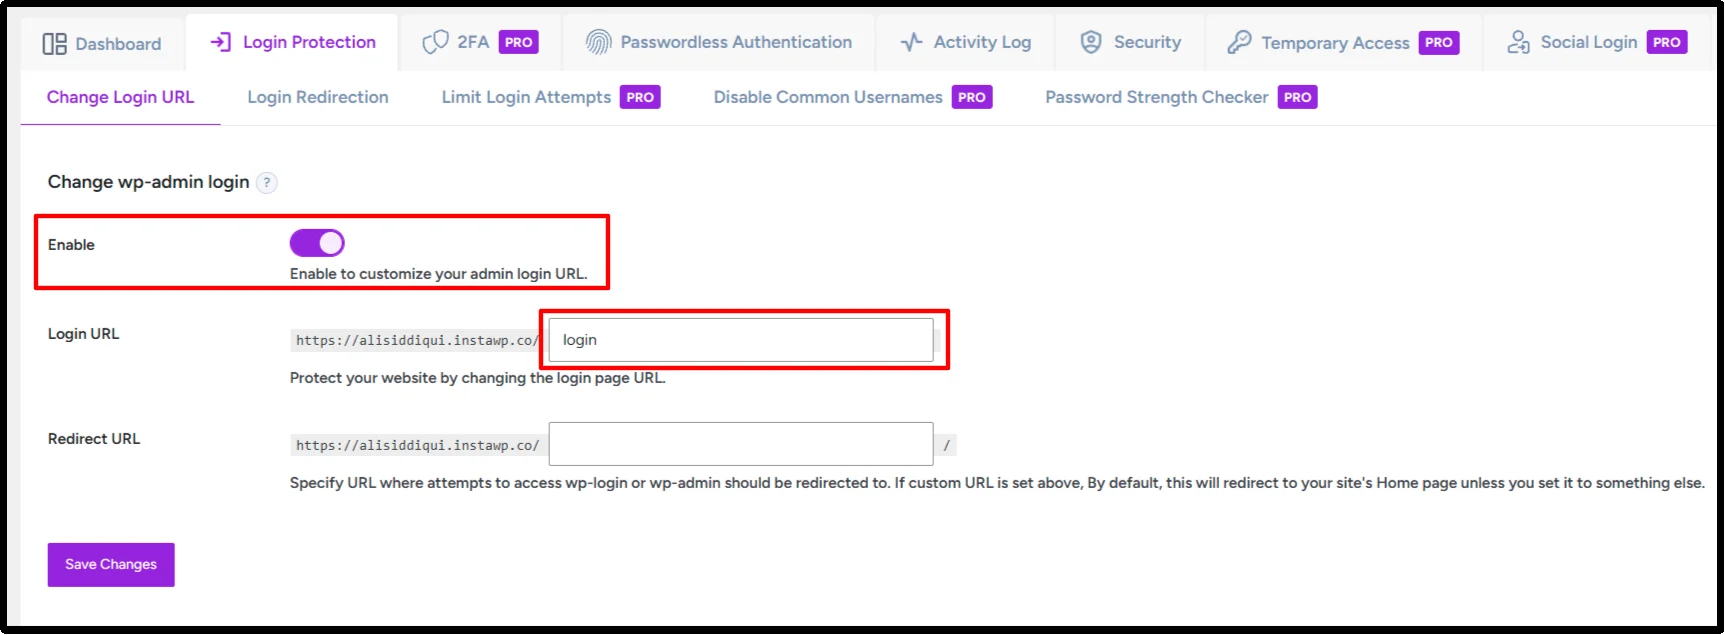
- Then change the Login URL to whatever you decide. Ensure it is unique, as the purpose is to hide the WordPress Admin URL.
For example, you could use:
/my-secret-login/
- Click on Save Changes.
Your custom login address would then use that path instead of the familiar WordPress login route.
Pick something you can remember, but don’t choose an obvious alternative such as login, admin-login, or wp-login.
All In One Login recommends using a unique login URL that’s difficult to guess.
You might also want to read our detailed guide on: How to Change Your WordPress Login URL Safely (Expert Guide)
Step 3: Set a Redirect for the Old Login URL (Optional)
All In One Login provides a Redirect URL field for visitors who try to access the old /wp-admin/ URL.
You can send those visitors to a custom 404 page or another URL instead. It isn’t the same thing as a post-login redirect that sends an authenticated user to a different page.
- Enter a URL where you will redirect a visitor from your old login URL.

- Click on Save Changes.
If you face any issues regarding the redirect, go check out our guide → How To Fix WP-Admin Redirects to Homepage Issue [5 Easy Ways].
Step 4: Test the New Login URL
- Now open your new login URL in a private or incognito browser window.
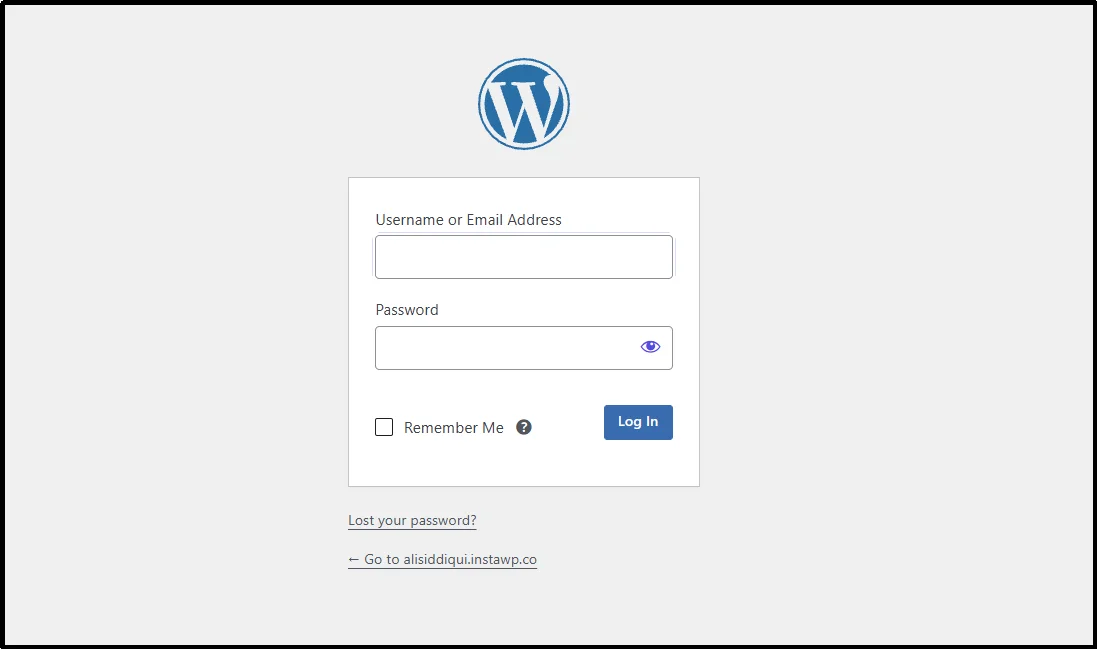
- Enter a valid WordPress username or email and password.
- Confirm that WordPress signs you in, then log out.
- Now, if you redirected the URL, then test /wp-admin/ separately.
All In One Login can also add other layers around the login process, including two-factor authentication, login attempt limits, activity monitoring, CAPTCHA integrations, and IP or user controls, depending on your plan and configuration.
What Happens After You Change the WordPress Login URL?
Changing the login URL doesn’t rename the /wp-admin/ directory. It changes the route users follow to reach the WordPress login process.
Your WordPress dashboard, posts, pages, plugins, themes, and user accounts don’t move to another directory. Logged-in administrators can still access the administration area through /wp-admin/.
With All In One Login, you can also configure what happens when visitors request the old /wp-admin/ route after enabling the custom login URL.
Can Someone Still Find My Custom Login URL?
Yes. A custom login URL isn’t impossible to discover. Someone could find it through links, redirects, browser history, leaked information, website behavior, or automated probing.
That’s why you shouldn’t treat the custom URL as a secret password. Use it as one layer of your WordPress login security.
Method 2: Change the WordPress Login URL With Custom Code
You can customize WordPress login URLs with PHP, but this approach requires much more technical knowledge. You shouldn’t simply rename wp-login.php and assume WordPress will continue working normally.
Important: The login_url filter only changes login URLs generated by WordPress through wp_login_url(). It doesn’t create a replacement for wp-login.php, block direct access to the original endpoint, or provide a complete custom authentication system.
The WordPress login system handles authentication and several related actions, including password recovery. WordPress also generates login URLs through core functions and hooks.
So, if you build a replacement login system, you need to account for the complete authentication flow.
Step 1: Back Up Your Site
- Create a full backup of your WordPress files and database.
- 2. Make sure you have hosting-level access through your control panel, file manager, FTP, SFTP, or SSH so you can recover the site if the custom login implementation causes problems.
You should also confirm that you can access your hosting control panel, file manager, FTP, or SFTP account. That recovery access can save you from a locked-out admin account.
Step 2: Create a Custom Login Entry Point
- A developer can create a custom PHP entry point for the login process.
For example, the new entry point might use a path such as:
custom-login.php
- Don’t simply copy wp-login.php, rename it, and assume the job is finished.
The core login file handles more than the visible login form. A custom implementation must account for authentication requests, redirects, password recovery, and any other WordPress or plugin functionality that depends on the standard login flow.
This is where the code method becomes significantly harder to maintain.
Step 3: Update Login URLs Carefully
Change the URL returned by wp_login_url().
You can use code like this to point WordPress-generated login links to your custom login file:
add_filter( ‘login_url’, function( $login_url, $redirect, $force_reauth ) {
$login_url = home_url( ‘/custom-login.php’ );
if ( $redirect ) {
$login_url = add_query_arg( ‘redirect_to’, $redirect, $login_url );
}
if ( $force_reauth ) {
$login_url = add_query_arg( ‘reauth’, ‘1’, $login_url );
}
return $login_url;
}, 10, 3 );
This filter changes the URL returned by WordPress’s wp_login_url() function. It doesn’t replace wp-login.php, block direct requests to it, or create the authentication logic required by your custom endpoint.
The example also preserves the redirect_to and reauth parameters used by WordPress login URLs. Your custom endpoint must still handle those parameters correctly.
So, you’ll need to handle the rest of the authentication flow separately, including logout, password recovery, redirects, and any plugin that relies on the standard WordPress login process.
Step 4: Handle Direct Access to wp-login.php
Don’t block wp-login.php immediately after creating your custom login file.
First, make sure the new login URL works correctly.
- Test your custom login URL.
- Test login and logout.
- Test password recovery.
- Check whether your themes and plugins rely on wp-login.php.
- Only then decide how you’ll restrict direct access to the original login endpoint.
A broad server rule can break legitimate WordPress authentication requests, so test the complete login flow before applying one.
Custom login code also requires ongoing maintenance. Test it again after major WordPress updates to make sure authentication and password recovery still work correctly.
A filter that changes the URL returned by wp_login_url() doesn’t automatically block someone from requesting /wp-login.php directly. It also doesn’t create the authentication logic that your replacement endpoint needs.
That’s why a one-line filter shouldn’t serve as the entire solution for hiding the WordPress login URL.
If you build this system yourself, test every login-related action before restricting the original endpoint.
Another Option: Restrict WordPress Login Access by IP
IP restrictions solve a different problem.
Instead of changing the login URL, a server or firewall can limit who can reach the login endpoint.
For example, a private company site might allow access to wp-login.php only from known office or VPN IP addresses.
That approach can work well in controlled environments. It becomes harder to manage when administrators work from changing IP addresses or multiple locations.
WordPress’s current security guidance includes server-level and WAF-based protections for login endpoints, including IP restrictions and rate limiting.
Don’t confuse this with hiding wp-admin.
Which Method Should You Choose?
Both approaches can help you hide the WordPress admin URL, but they differ sharply in implementation and maintenance.
| Approach | Technical skill | Maintenance | What it changes | Main consideration |
| All In One Login | Low | Low | Changes the WordPress login URL | Requires a plugin |
| Custom PHP | High | High | Can customize the login route and authentication flow | Requires development, testing, and ongoing maintenance |
| IP restriction | High | Medium to high | Controls who can reach the login endpoint | Works best with predictable administrator IPs |
For most site owners, All In One Login offers a simpler workflow because you can manage the custom login URL from the WordPress dashboard instead of maintaining custom authentication files.
Developers who need a custom authentication architecture can use the code route, but they should understand the WordPress login lifecycle before changing core authentication behavior.
More Ways to Protect Your WordPress Admin URL
Changing the login URL addresses one part of the problem.
Your administrator account still needs protection.
- Use Two-Factor Authentication
Two-factor authentication adds another verification step after the password.
All In One Login supports app-based and email-based 2FA, along with backup codes and a grace period within its 2FA feature set.
That extra step can help protect an administrator account if someone obtains the password.
WordPress’s security guidance also recommends two-factor authentication as an additional defense for administrator accounts.
Here are the 10 Best WordPress 2FA Plugins to Secure Your Website (2026) you should know before making your final choice.
- Limit Failed Login Attempts
Rate limiting can restrict repeated failed authentication attempts.
All In One Login includes controls for limiting failed login attempts, locking users out after repeated failures, setting lockout durations, and customizing lockout messages.
This limits repeated authentication attempts even if someone discovers your custom login URL.
Did you mistakenly get locked out of your WP Login URL? Check out the 4 methods to unblock limit login attempts.
- Use Temporary Login URLs
Temporary login URLs can give trusted users access without requiring you to share a permanent WordPress password. All In One Login lets you create temporary access links with expiration times and usage limits.
This can be useful when you need to give a developer, support agent, or other trusted user short-term access to your WordPress dashboard.
- Add CAPTCHA or Bot Protection
CAPTCHA and bot-verification tools can add another barrier against automated login attempts.
All In One Login supports Google reCAPTCHA, while Cloudflare Turnstile is available depending on your plan and configuration.
Choose the verification method that fits your site’s users and technical setup.
- Monitor Failed and Suspicious Login Activity
Login monitoring gives you a record of authentication activity.
All In One Login provides activity logs and failed-attempt monitoring, with information such as usernames, IP addresses, dates, times, and lockout activity available through its security features.
That information can help you identify repeated login failures or investigate suspicious access patterns.
- Control Login Access by IP
IP-based access controls can help restrict who can reach your WordPress login area. All In One Login lets you whitelist trusted IP addresses or blacklist specific IPs.
This gives you another access-control layer when you need to allow or block login access based on specific IP addresses.
- Protect XML-RPC
Changing the login URL doesn’t automatically protect other authentication surfaces such as xmlrpc.php. If your site doesn’t need XML-RPC, consider disabling it. If your site depends on XML-RPC, use appropriate access controls and rate limiting instead.
- Consider Passkeys
Passkeys use WebAuthn-based authentication and can provide a phishing-resistant alternative to traditional passwords. If your authentication setup supports passkeys, they can add another layer of protection beyond your WordPress login URL.
- Customize Login Error Messages
Default login errors can reveal information about authentication failures. All In One Login lets you customize WordPress login error messages so you can control what users see when authentication fails.
Use generic messages when possible to avoid revealing unnecessary information about usernames or login attempts.
Common Mistakes When Hiding the WordPress Login URL
Don’t Delete wp-login.php
WordPress uses wp-login.php as part of its authentication and password-recovery system. Deleting the file can break your login flow.
Don’t Rely on the Login URL Alone
A custom login URL can reduce automated requests against the default endpoint, but it doesn’t replace 2FA, rate limiting, CAPTCHA, strong passwords, software updates, or login monitoring.
Don’t Choose an Obvious Login Slug
Avoid predictable paths such as /login/, /admin-login/, or /wp-login-new/ if your goal is to move away from the default WordPress login route.
Don’t Block /wp-admin/ Without Testing
Broad server restrictions can interfere with WordPress functionality. Test firewall and server rules carefully before applying them to a production site.
Don’t Skip Password Recovery Testing
Test the password-reset process after changing your login URL, especially if you’ve built a custom authentication flow.
Protect Your WordPress Login After Changing the URL with All In One Login
Changing the WordPress login URL can reduce automated requests against the default login endpoint. But it should only be one part of your overall security setup.
All In One Login gives you a dashboard-based way to change your WordPress login URL. It also includes features such as two-factor authentication, failed-login monitoring, login attempt limits, user enumeration protection, IP access controls, temporary login URLs, and CAPTCHA integrations. The available features depend on your plan.
You can also use All In One Login to monitor user enumeration activity, whitelist or blacklist specific IP addresses, track failed and lockout activity, and create temporary access links with expiration and usage limits. These controls can add extra protection around your WordPress login.
The code-based approach gives developers more control, but it requires more maintenance and careful testing. Server-level restrictions can also add another layer of protection for sites with controlled administrator access.
Changing your login URL alone won’t secure your WordPress site. Combine it with strong authentication, sensible rate limits, updated software, and ongoing monitoring.
Want to change your WordPress login URL from the dashboard? Try All In One Login to create a custom login path and add more protection to your WordPress login.
Frequently Asked Questions
Does hiding the WordPress admin URL stop hackers completely?
No. It can reduce automated attacks targeting the default login URL, but attackers can still discover custom URLs or target other vulnerabilities. Use it alongside strong passwords, 2FA, login limits, and regular updates.
Is it safe to delete wp-login.php?
No. wp-login.php handles WordPress authentication and password recovery. Deleting it can break login access, so use a tested alternative instead.
Does .htaccess actually hide the WordPress login page?
Not by itself. A simple redirect doesn’t remove or protect wp-login.php. Server-level rules can restrict access, but they require careful configuration.
Will hiding wp-login.php affect my SEO?
Generally, no. The login endpoint isn’t part of your public content. Just make sure your redirects and access rules don’t affect public pages or SEO-related URLs.
What’s the difference between hiding the admin URL and hiding the admin bar?
Hiding the admin URL changes how users access WordPress login. Hiding the admin bar only removes the toolbar shown to logged-in users. It doesn’t hide /wp-admin/ or /wp-login.php.
What is the Default WordPress admin URL?
WordPress commonly uses /wp-admin/ for the dashboard and /wp-login.php for login. The exact URL can differ if WordPress runs in a subdirectory.
Is hiding the WordPress admin login URL worth it?
It can reduce exposure to the default login endpoint, but it’s not a complete security solution. Combine it with strong passwords, 2FA, login limits, updates, and monitoring.