

After a user logs in to your WordPress site, the best move is to redirect them to a page that helps them take the next step. For a membership site, that might be a private dashboard. For an online store, it could be the account page. If someone logs in to view restricted content, sending them back to that page makes the process smoother.
WordPress can send users to the admin area or back to the page they requested, depending on how they sign in. You can also set a custom destination with a login URL, a code snippet, or a plugin.
To help you implement it on your WordPress site, we’ve prepared a guide that explains three ways to set up a WordPress redirect after login, including role-based redirects and common fixes.
Why Redirect Users After Login?
A login redirect helps users reach the right destination without extra clicks. It also lets you tailor the login experience to different tasks.
For example, you might want to:
- Send customers to their account page.
- Take members to a private dashboard.
- Return users to the page they wanted to view before logging in.
- Send different user roles to different pages.
- Keep users on the front end when they do not need the WordPress admin area.
Choose a destination that matches what users need to do next. A redirect should make the next step easier, not add another obstacle.
3 Effective Ways to Redirect Users After Login in WordPress
The best method depends on how much control you need. Use a WordPress login security and customization plugin to manage redirects from the dashboard, the redirect_to parameter for a specific login link, or WordPress’s login_redirect filter for custom rules.
Method 1: Set Up Login Redirects with All In One Login (RECOMMENDED)
All In One Login lets you configure login and logout redirection for all users, selected roles, or specific users. You can use these controls to send people to a relevant page after they sign in, without adding a custom code snippet.
To redirect users after login in WordPress using All In One Login:
- You need to install and activate All In One Login.
- Configure redirection settings.
- Test the login flow.
When to use this method: Choose a plugin if you want to manage redirects from the WordPress dashboard without writing code.
Step 1: Install and Activate All in One Login
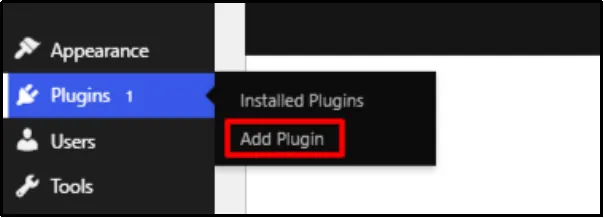
- In your WordPress dashboard, go to Plugins → Add Plugin
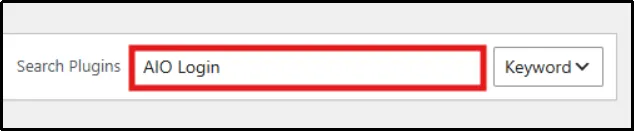
- Type All In One Login in the search bar.
- Click Install Now, then Activate.
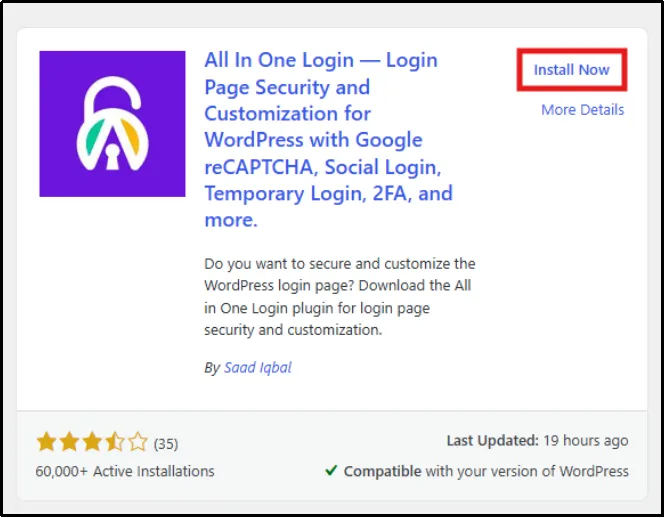
All In One Login is now active, and you can configure its redirect settings.
Step 2: Configure Redirection Settings
- Go to All In One Login → Login Protection.
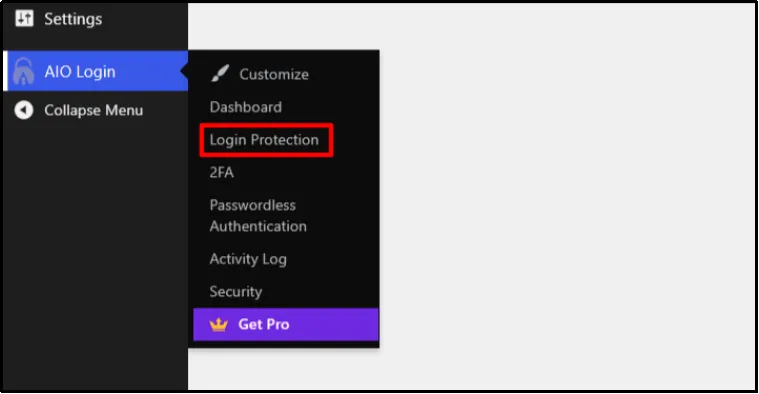
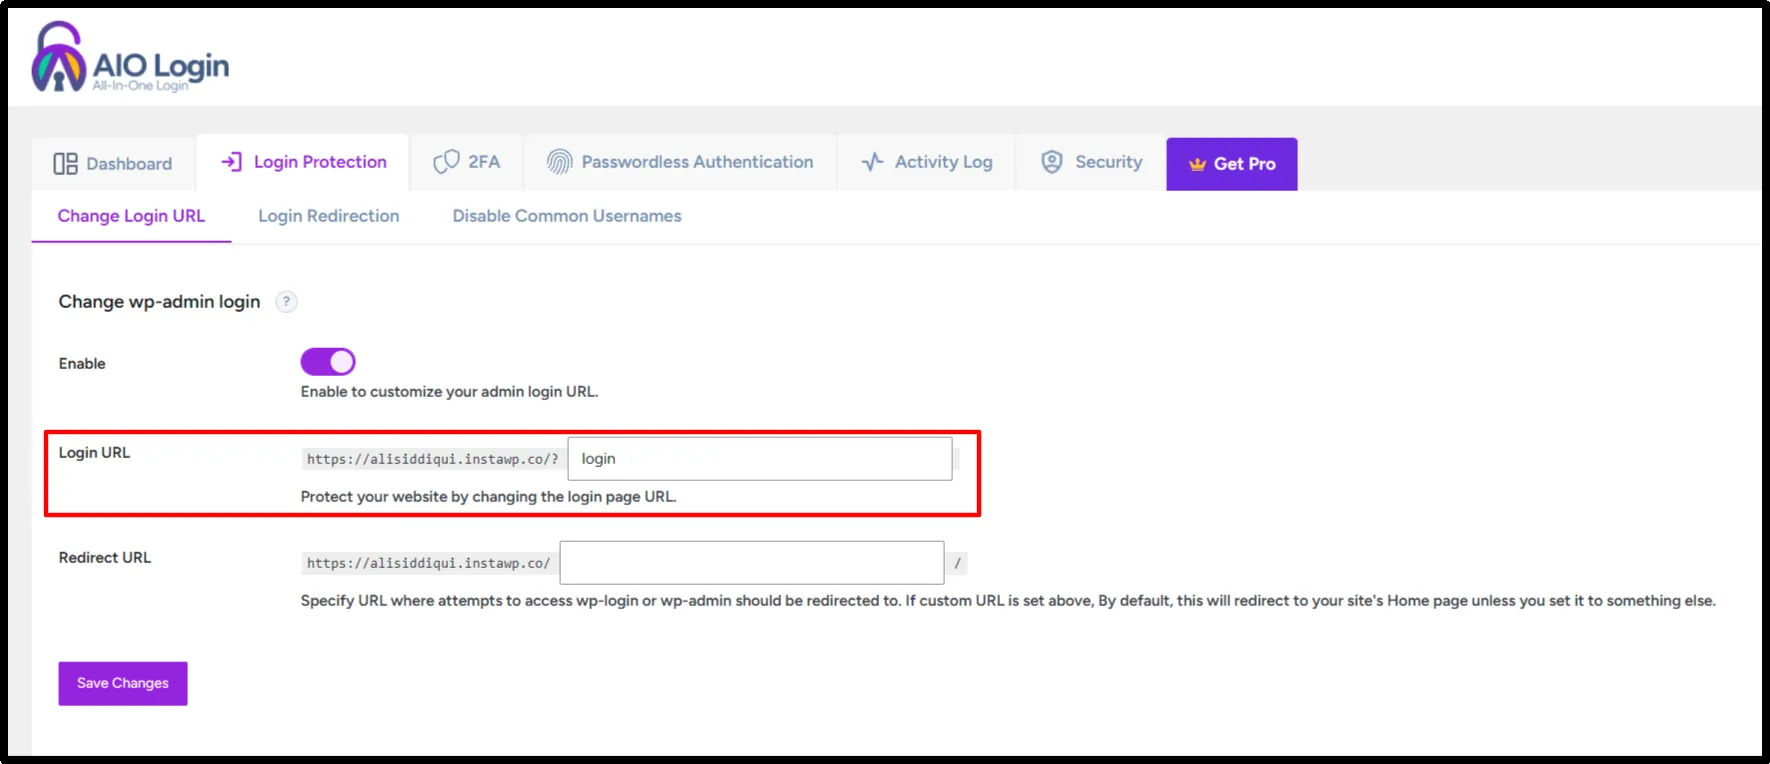
- Optional: You can also change the default WordPress login URL (wp-login.php) to a custom login URL using All In One Login.
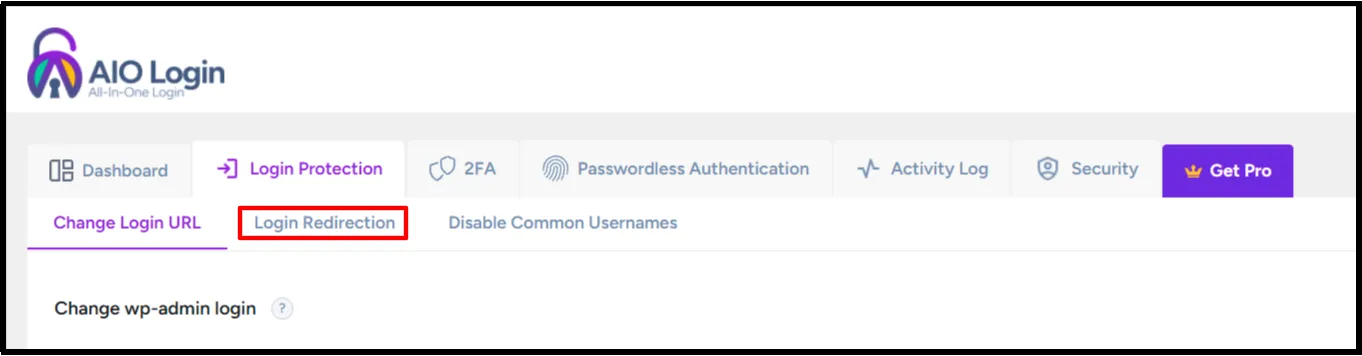
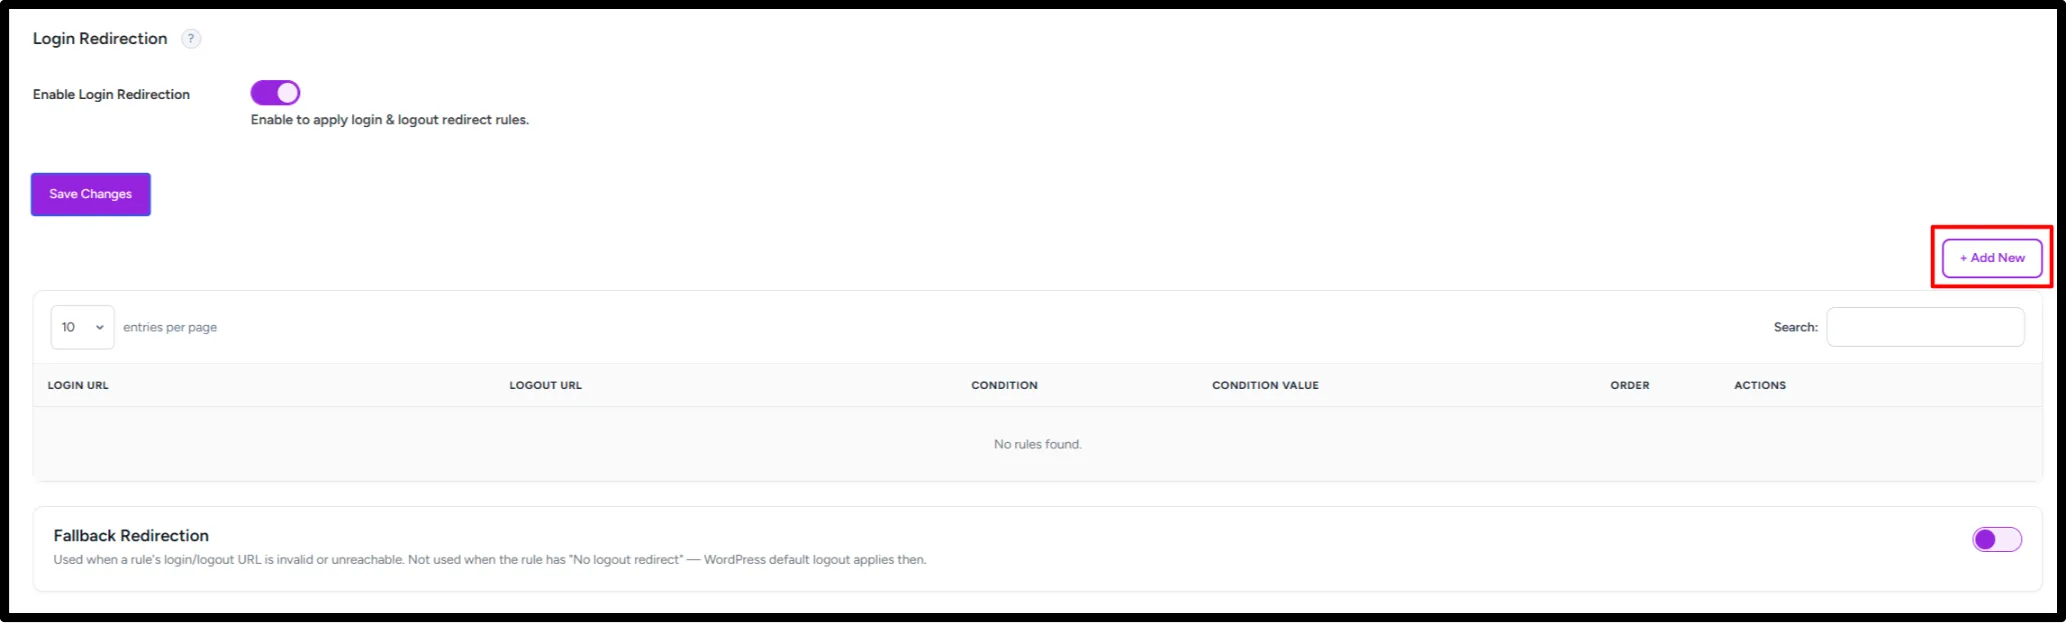
- Click on the Login Redirection tab.
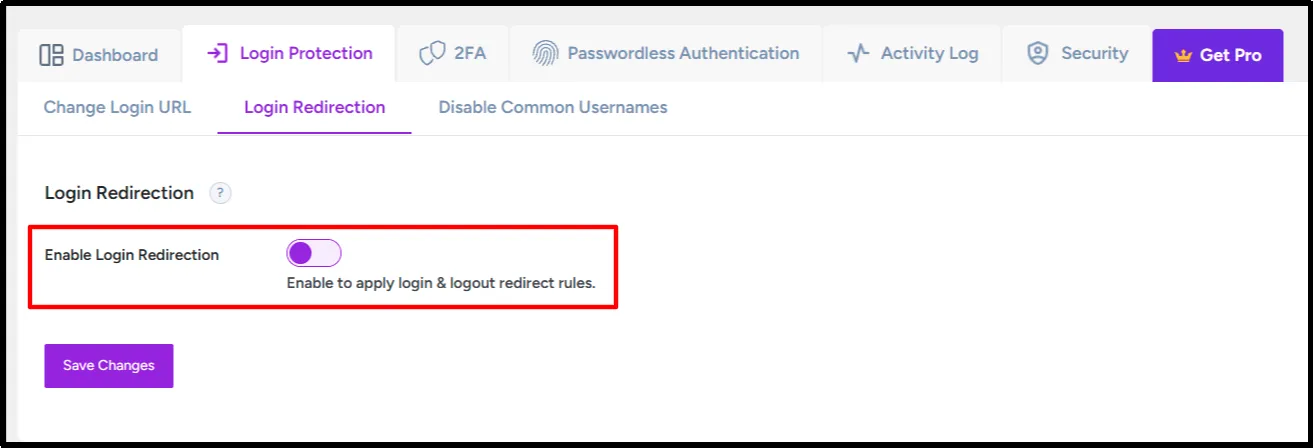
- Enable Login Redirection and click on Save Settings.
- Click on Add New.
- In this pop-up, you can add your desired redirect rule.
- Set a Condition Type: Choose who the redirect rule applies to, such as all users, specific user roles, or individual users. Upgrade to All In One Login Pro to access all condition types.
- Set a Login Redirect URL: Select an internal page or enter a custom URL where users should land after logging in.
- Set a Logout Redirect URL – Select any internal page or choose a custom URL to redirect to when you log out. For instance, thank you for your time.
- Set Priority Order: You can add multiple redirect rules and control their execution order. A priority of 1 is the highest, while 0 disables the rule. When multiple enabled rules match, the rule with the highest priority takes precedence.
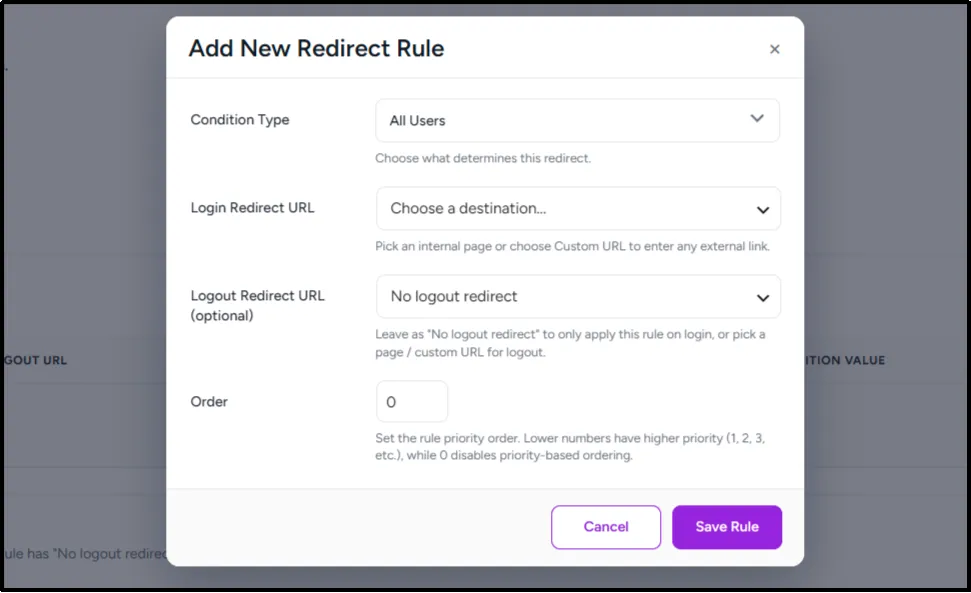
- After configuring the login redirect URL as per your requirement, click on Save Rule.
This is how your record will appear.

Step 3: Test the Login Flow
- Once everything is finalized, you can test by logging into the WordPress site.
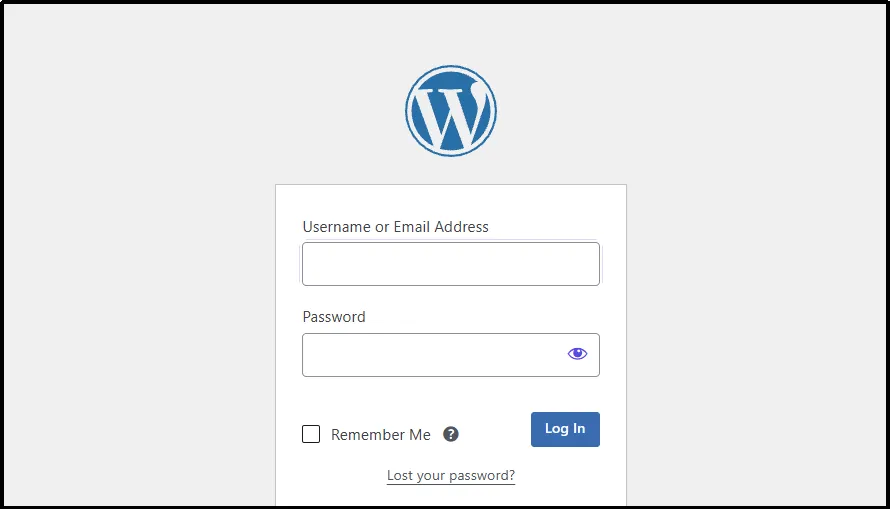
- Enter your username and password. After you sign in, WordPress will send you to the destination page you configured.

Your login redirect is now configured. Test it by signing in with an account that matches the rule and confirming that WordPress sends you to the destination page you selected.
Method 2: Use the redirect_to parameter for a specific login link
WordPress supports a redirect_to parameter that specifies where users should go after a successful login. This works well when you want to direct users to a particular page through a custom login link. WordPress validates redirect destinations, so use a permitted URL on your site.
For example, use a URL like this to send users to a member dashboard:
Replace example.com with your domain and /member-dashboard/ with your destination page. The example URL encodes the destination so it can appear safely as a query parameter.
You can link to this URL from a button or page where users start the login process. After they sign in, WordPress can send them to the requested destination.
Method 3: Add a login_redirect filter
WordPress provides the login_redirect filter, which lets developers change the destination after login. Use it when you need a rule that applies consistently, such as sending non-administrators to a custom dashboard.
Add this code to a site-specific plugin or your child theme’s functions.php file. The snippets below go inside an existing PHP file, so you do not need to add another opening <?php tag. If you create a standalone PHP file, include the opening tag at the top.
add_filter( ‘login_redirect’, ‘my_site_login_redirect’, 10, 3 );
function my_site_login_redirect( $redirect_to, $requested_redirect_to, $user ) {
if ( is_wp_error( $user ) || ! ( $user instanceof WP_User ) ) {
return $redirect_to;
}
// Keep administrators on their default destination.
if ( in_array( ‘administrator’, (array) $user->roles, true ) ) {
return $redirect_to;
}
return home_url( ‘/member-dashboard/’ );
}
This example sends users who are not administrators to /member-dashboard/. It leaves administrators on their default destination.
Change the destination to a page that exists on your site. If you add the code to functions.php, use a child theme so a theme update does not overwrite your changes. A site-specific plugin is another option if you want the rule to remain active when you change themes.
Important: Test the snippet on a staging site or make a backup before changing theme files. A PHP error can affect your site.
Redirect different user roles to different pages
You can also check a user’s role and return a different destination for each group. For example:
add_filter( ‘login_redirect’, ‘my_site_role_login_redirect’, 10, 3 );
function my_site_role_login_redirect( $redirect_to, $requested_redirect_to, $user ) {
if ( is_wp_error( $user ) || ! ( $user instanceof WP_User ) ) {
return $redirect_to;
}
if ( in_array( ‘administrator’, (array) $user->roles, true ) ) {
return admin_url();
}
if ( in_array( ‘customer’, (array) $user->roles, true ) ) {
return home_url( ‘/my-account/’ );
}
if ( in_array( ‘subscriber’, (array) $user->roles, true ) ) {
return home_url( ‘/member-dashboard/’ );
}
return $redirect_to;
}
Update the role names and page paths to match your site. A user can have more than one role, so the code checks the roles in order and uses the destination for the first matching role. Place the role conditions in the order you want WordPress to check them.
How to Redirect Users After Logout
You can also choose where users land after they log out. A public homepage or a thank you page may be a sensible destination, depending on your site.
All In One Login supports logout redirection; set the logout redirect URL in the New Redirect Rule.
- Head back to All In One Login → Login Protection → Login Redirection.
- Click on Add New.
- Select a logout redirect URL and then click on Save Rule.
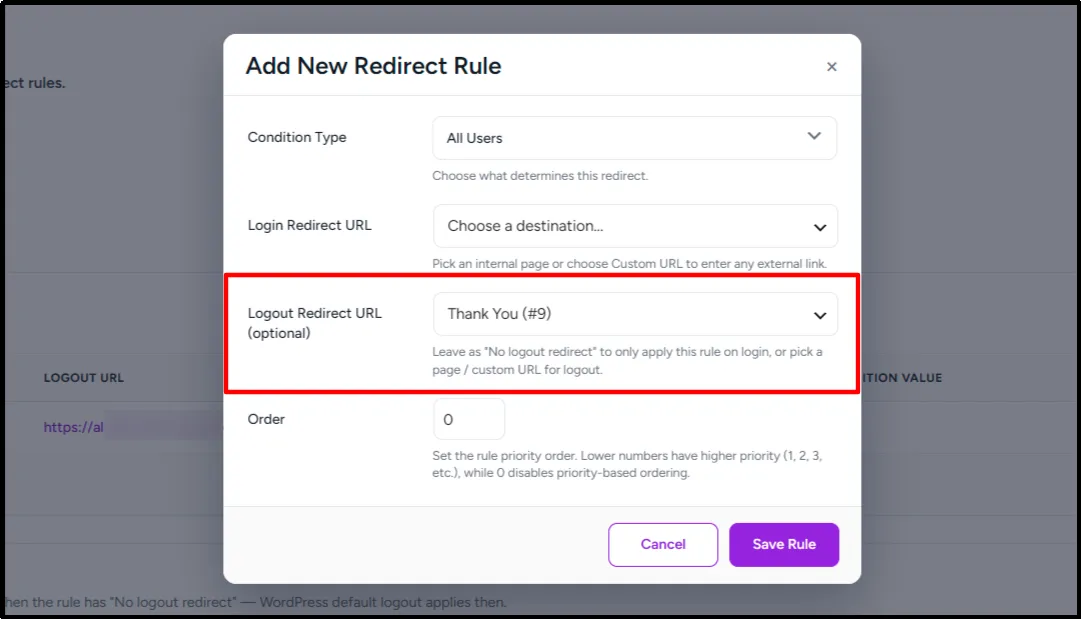
- Log out of your WordPress site and check whether you’re redirected to the selected page.

Troubleshooting WordPress Login Redirects
If a redirect does not work as expected, review your All In One Login redirect rules and test the login flow before changing code.
1. Users still land on the dashboard
Go to All In One Login → Login Protection → Login Redirection and check that the rule applies to the account you’re testing. If the rule targets specific roles or users, make sure the account matches the condition.
2. Users land on the wrong page
Open the relevant redirect rule and check its destination URL. If you have multiple rules, check their conditions and priority order. When more than one enabled rule matches, the highest-priority matching rule applies.
3. The redirect works with one login method but not another
Some plugins, social login tools, or custom forms may handle their own login flow. Test the affected login method and check whether it uses the same redirect settings as your standard WordPress login.
4. Users get redirected in a loop
Make sure the destination page is accessible to signed-in users and does not send them back to the login page. Then review your All In One Login rules and any other redirect settings for conflicts.
5. Users don’t return to the page they originally requested
Check whether a redirect rule sends everyone to a fixed destination. That rule may take precedence over the requested page. If you want users to return to their original destination, review the rule’s conditions and priority order.
Make WordPress Login Redirects Easier with All In One Login
The right redirect method depends on how much control you need. Use redirect_to for a specific login link, or the login_redirect filter when you’re comfortable adding code and managing custom rules. But if you want to set up redirects effectively, use All In One Login.
All In One Login lets you configure login and logout redirects for all users, selected roles, or specific users. That makes it easier to send customers, members, and other visitors to the pages they need after signing in, while keeping redirect settings manageable from your WordPress dashboard.
Get All In One Login to simplify your WordPress login redirects and guide users to the right page after they sign in.
Frequently Asked Questions
How do I redirect users after login in WordPress?
You can use the redirect_to parameter for a specific login link, the login_redirect filter for a code-based rule, or a plugin to manage redirects from the dashboard.
Can I redirect users based on their WordPress role?
Yes. The login_redirect filter can check a user’s role and return a different destination. Some login plugins also provide role-based redirect settings.
Can I send users back to the page they visited before logging in?
Yes. WordPress can use the redirect_to parameter to carry a requested destination through login. Some plugins also offer a setting for returning users to their previous page.
Can I redirect users after logout?
Yes. Logout redirection is separate from login redirection. Use a plugin that supports logout redirects or configure the appropriate logout behavior in your custom implementation.
Will a login redirect stop users from accessing the WordPress dashboard?
No. A redirect changes where users land after login; it does not, by itself, change their permissions. Use WordPress roles and access controls to manage who can access the dashboard.