Adding social login to your WordPress site makes it easier for visitors to sign in without creating a new account. Instead of filling out a form or remembering another password, users can log in with social links in one click.
It reduces friction, speeds up the process, and helps improve conversions on your site. Whether you run a blog, a membership site, or a WooCommerce store, social login can enhance the user experience while maintaining security.
This guide will explore how to add social login to WordPress using All-in-One Login, the best WordPress plugin for login security.
However, before that, let’s examine why we should do so.
Why Add Social Login to WordPress?
Most users already have accounts with widely used social icons, such as Google, Facebook, or Microsoft. Letting them log in with those saves time and builds trust. It also helps reduce fake signups, weak passwords, and forgotten credentials.
If you’re running a membership site or online store, social login can speed up checkouts and improve retention. People are more likely to come back when logging in takes just one click.
It also helps you collect verified email addresses and basic profile data without needing extra forms or tools.
With All-in-One Login, you can add these social login buttons without writing a single line of code. It’s built for WordPress and enhances security effortlessly.
Before jumping into the process, let’s take a moment to understand how social login works. The following section will help you understand each step in the process.
How Social Login Works on WordPress
When a user clicks a social login button, they are redirected to the provider’s secure login page. This could be Google, Facebook, or Microsoft. Once they sign in, the provider confirms their identity and sends that information back to your WordPress site.
Your site then uses this data to log the user in or create a new account if it’s their first visit. All of this happens behind the scenes using a protocol called OAuth, which keeps the process secure.
The plugin used for adding social logins, in this case, All-in-One Login, connects to each provider, handles authentication, and brings the user back to your site logged in and ready to go.
Add Social Login in WordPress: 4 Steps
Now that you understand the importance of how social logins work, here’s how to add them to your WordPress to enhance customer experience and convenience.
Step 1. Download All-in-One Login WordPress Plugin.
Earlier, we disclosed our use of this specific plugin for adding social logins. The purpose is the initiative, clean design, ease of use, and overall ease of working with it.
Not to mention, the biggest reason is the added benefit of advanced security—more on this later.
First and foremost, go to your WordPress and download All-in-One Login. You can do that by navigating to Plugins ⇒ Add Plugin ⇒ Search for AIO Login ⇒ Install and Activate.

Afterward, you must also add AIO Login’s business premium version, as the social login feature is exclusive to the business or professional plan. Therefore, visit our pricing page and select a plan.
Once you find the plan that fits your needs, purchase it, and you will receive an email with the ZIP file and a license key.
Go back to the Plugins ⇒ Add Plugin ⇒ Upload the ZIP file that you received with the welcome email ⇒ Enter the license key, and there you go!

Once the All-in-One Login Pro is up and ready, it’s time for the next step.
Step 2. Configure Google.
All-in-One Login allows three choices for social logins, including Gmail, Microsoft, and Facebook. In this guide, we will use Gmail. Although the process differs with each configuration, the motive remains the same. We will learn more about this later in this article.
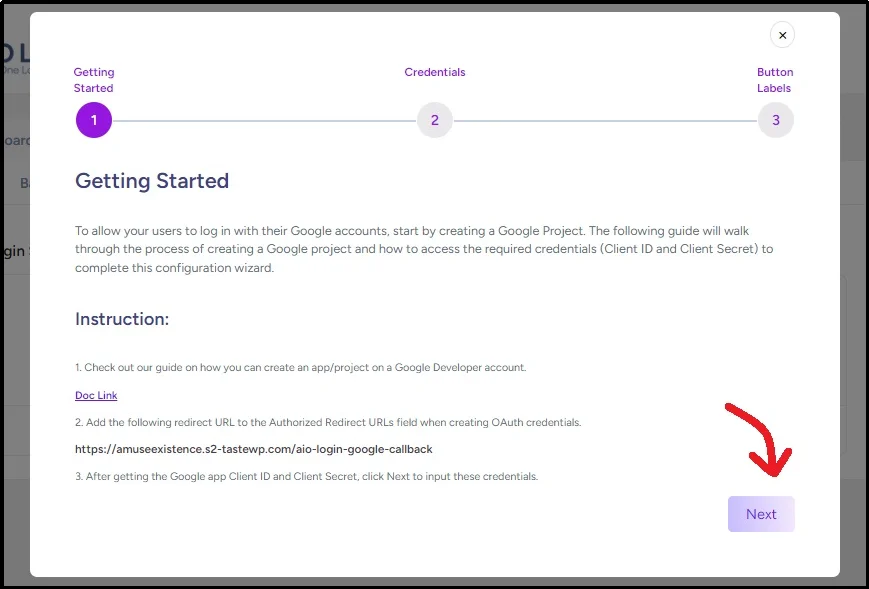
Navigate to AIO Login ⇒ Customize tab ⇒ Social Login subtab ⇒ Click Configure beneath the Google logo.
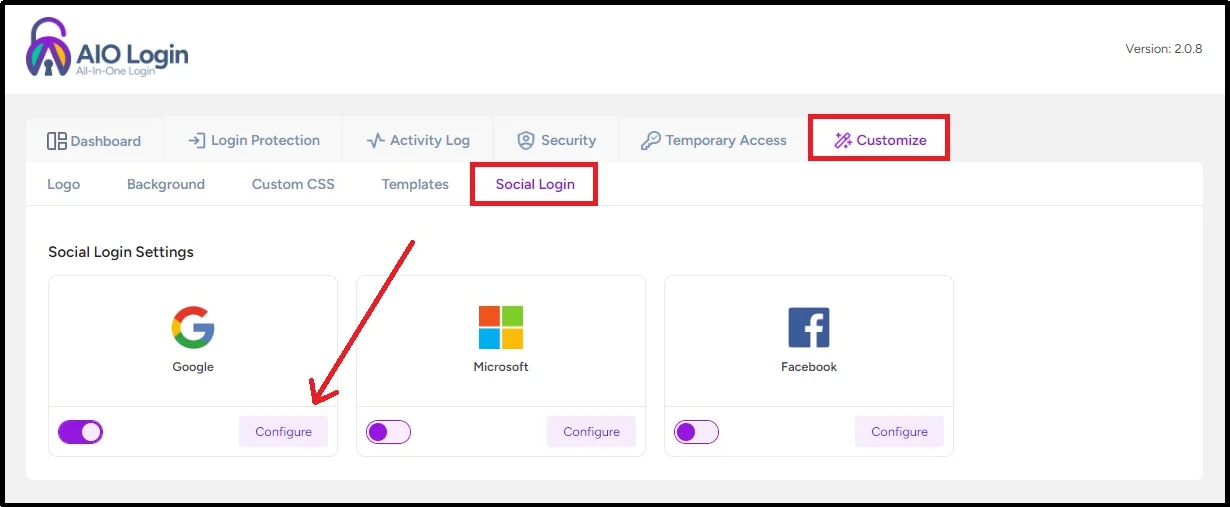
The following screen will pop up.
Copy the URL to be pasted later.
On to the third and a little complicated step.
Let’s begin with configuration!
Step 3. Set up Google Cloud Console.
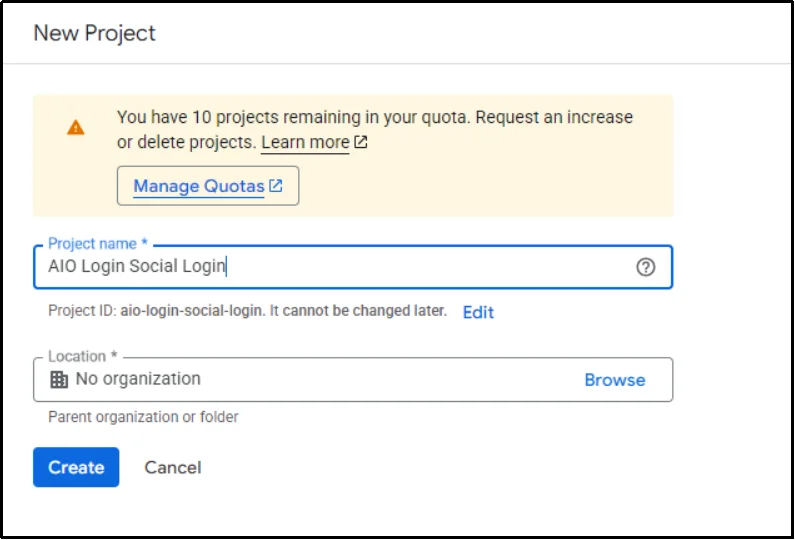
Go to Google Cloud Console and create a new project. Alternatively, you can also use an existing project.
Name your project and click Create.
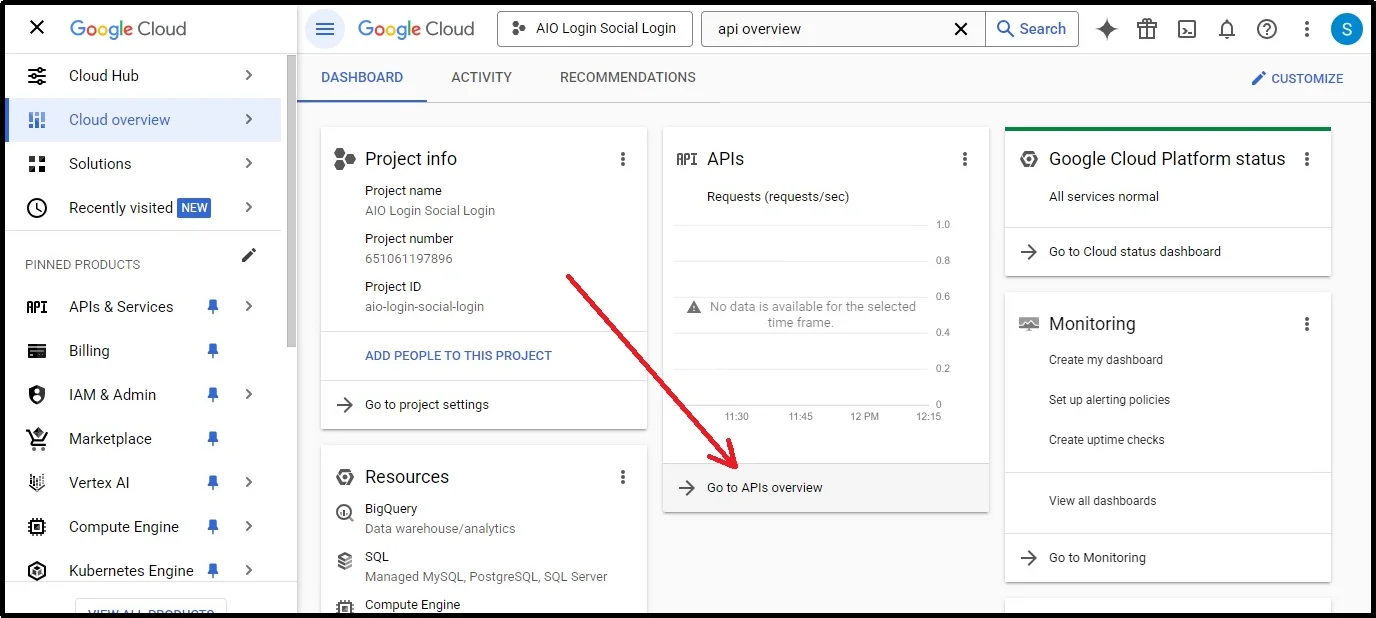
Afterward, head over to the dashboard and click Go to APIs overview.
Then select the OAuth consent screen from the navigation menu on the left side.
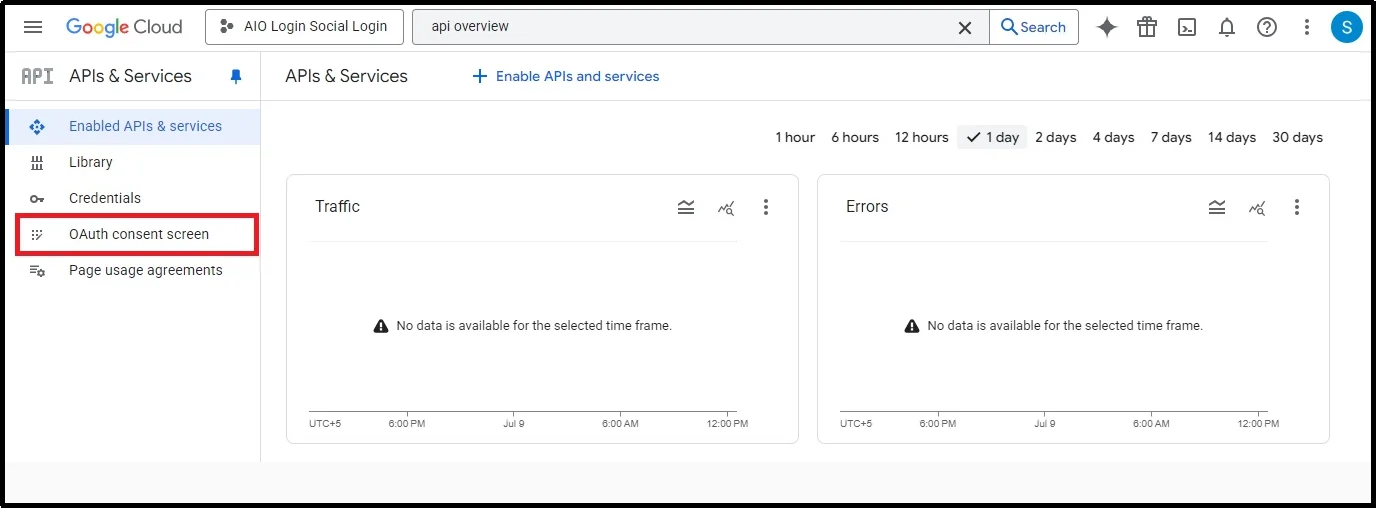
Click the Get Started button.

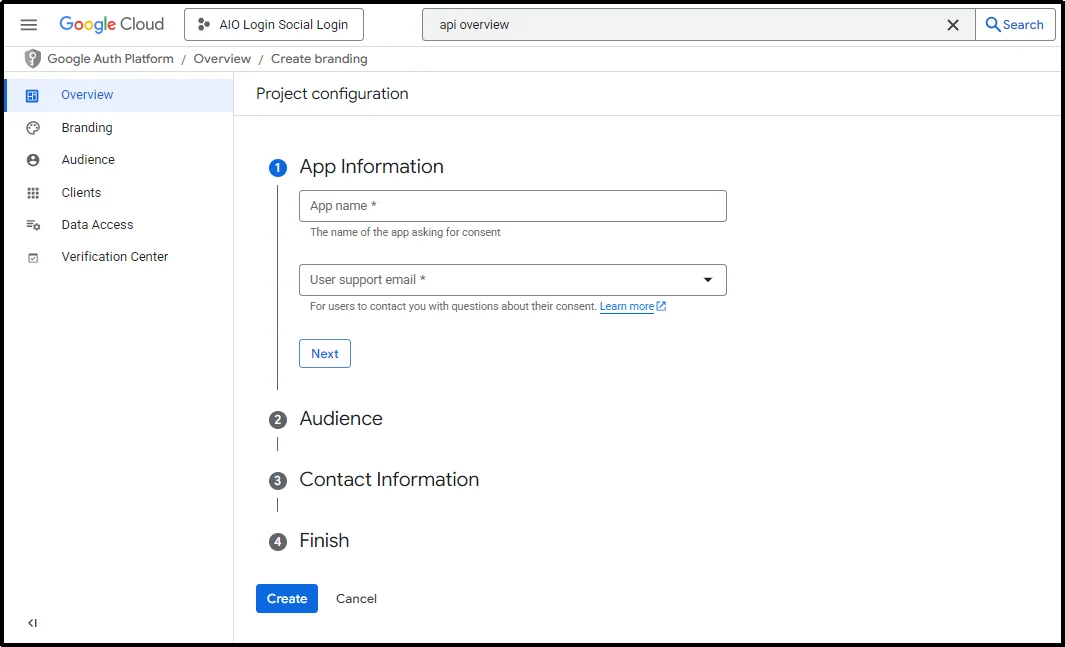
Next, you will have to create a project.
Please fill in the necessary fields with the appropriate information, including App name and User support email, and click Next.
Next, define your audience, choose from Internal or External, and click Next.
After entering contact information or email addresses that Google will use to notify you in case of a change to the project, you can enter multiple email addresses here.
Finally, read the service’s policy and check the ‘I agree to the Google API Services: User Data Policy’ box if you agree with the policy, and click Continue, and then Create.

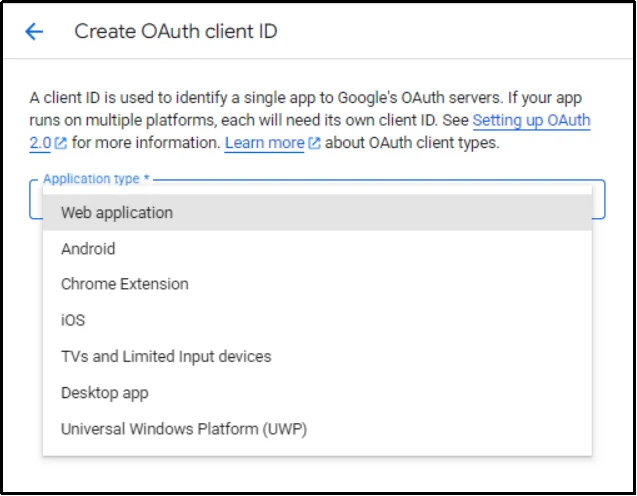
Thereafter, click Create OAuth Client.

Select Web application from the drop-down.
Scroll down until you find the ‘Authorized redirect URIs’ section.
Click the + Add URI button.

Paste the URL we copied in the last step and click Create.

You will see a pop-up screen with the necessary information.

Copy the Client ID and Client secret, and let’s get to the fourth and final step.
Step 4. Enter Credentials & Label The Button.
Head back to AIO Login and click Next.
Enter the credentials we copied in the last step and click Next.

Now comes the fun part!
You can customize the login and logout label text. Enter your desired text in the respective input boxes and complete the operation by clicking Finished.

Here’s how it appears on the front end.
Feeling dull, right?
Don’t worry! All-in-One Login offers complete customization of the login screen. Simply put, you can change the screen to make it feel like it belongs. The plugin enables you to change the logo and background. You can add a background image, colors, or simply use a template to instantly transform the look.
Learn more about customization: How to Customize WordPress Login User Interface Design [Step-by-Step]
Want To Go With Microsoft or Facebook?
As discussed earlier, the process is indifferent, but all you have to do is create an app on either Azure or Meta—depending on the one you choose—get the secret credentials, regardless of what they are named, and paste them in the AIO plugin.
For Facebook or Meta’s configuration, you will see App ID and App secret, and for Microsoft’s configuration, you will see Secret ID.
For a complete guide, please follow the links:
Managing User Data and Privacy (GDPR Compliance)
Moreover, it’s imperative to note that using social login encourages collecting personal data from users, such as names, profile pictures, or information, and email addresses. This means you must follow data protection laws, such as the GDPR, if your users are from the EU or other regions with similar rules.
Here’s how to stay ahead.
- Display a Privacy Policy. Your website must have a clear and visible privacy policy. It should explain what user data is collected through social login, why it is collected, and how it is stored.
- Ask for Consent. Let users know that by logging in with a social account, they agree to your privacy policy. You can show a short message near the login button or during sign-up.
- Honor Deletion Requests: If a user requests that you delete their account or personal data, you must comply. This is a legal requirement under data protection laws.
- Keep Your Data Secure: Ensure Your Website Is Safe. Keep WordPress, themes, and plugins updated to protect user data from exposure to common WordPress attacks or theft.
- Limit Data Collection: Only collect the information you need. Avoid asking for extra details unless they are necessary for your service to function correctly.
There’s More To All-in-One Login
Although this guide proves why All-in-One Login is the best plugin for adding social login in WordPress, the functionality of this fantastic plugin doesn’t end there.
As the name suggests, All-in-One Login offers comprehensive login security from password-guessing attacks.
Password-guessing attacks, such as brute force attacks, credential stuffing, and dictionary attacks, use trial and error to guess passwords by trying thousands of password combinations in a matter of seconds.
Combined with advanced artificial intelligence, these attacks have become even more detrimental for everyday WordPress users.
Thus, All-in-One Login is no longer a want but a need or necessity. The plugin offers powerful features against such attacks, including:
- Multi-factor authentication.
- Attempt limitation
- Allowlist/blocklist
- Change admin URL
- reCAPTCHA
- And much more.
Here are a few resources if you want to learn more:
- How to Add CAPTCHA to WordPress Login in 03 Easy Steps
- How to Set Up Two-Factor Authentication (2FA) for WordPress [3 Easy Steps]
- How to Implement WordPress Limit Login Attempts [3 Easy Steps]
Final Words
Social login is way more than just a convenience. It reduces the barriers to entry, helps users log in quickly, and makes your site feel more professional and trustworthy.
While the technical setup may seem complex at first, the process is straightforward when broken into clear steps. Just make sure you follow the correct setup for each provider, keep user data secure, and stay transparent about how that data is handled.
However, it’s imperative not to neglect cybersecurity when planning convenience for your audience. Always make sure to take every precautionary measure for the security of your site and your users.
For that, All-in-One Login offers fantastic features. Protect your login page from password-guessing attacks today. Download All-in-One Login!
Frequently Asked Questions
Q. How do I add a Social Login to WordPress?
To add social login to WordPress, install the AIO Login plugin from the WordPress plugin directory. Navigate to Customization ⇒ Social Logins, choose from Google, Microsoft, or Facebook. Get the secret client ID and code, paste it in the plugin, name the sign-in and sign-out buttons, and click Finished.
Q. Do I need coding knowledge to add social logins to WordPress?
No, you don’t need any coding skills to add social logins to your WordPress site. Most modern plugins, such as AIO Login, allow you to connect social platforms like Google or Facebook using simple, step-by-step settings. You just need to copy and paste a few details, such as the client ID and secret ID, from the provider, which guides usually walk you through clearly.
Q. Can I customize the appearance and placement of the social login buttons?
With All-in-One Login, yes. The plugin enables you to customize the appearance and placement of buttons on your site. You can adjust the size, color, label text, and even choose the background. Moreover, the plugin also lets you use custom CSS for more advanced styling if needed.