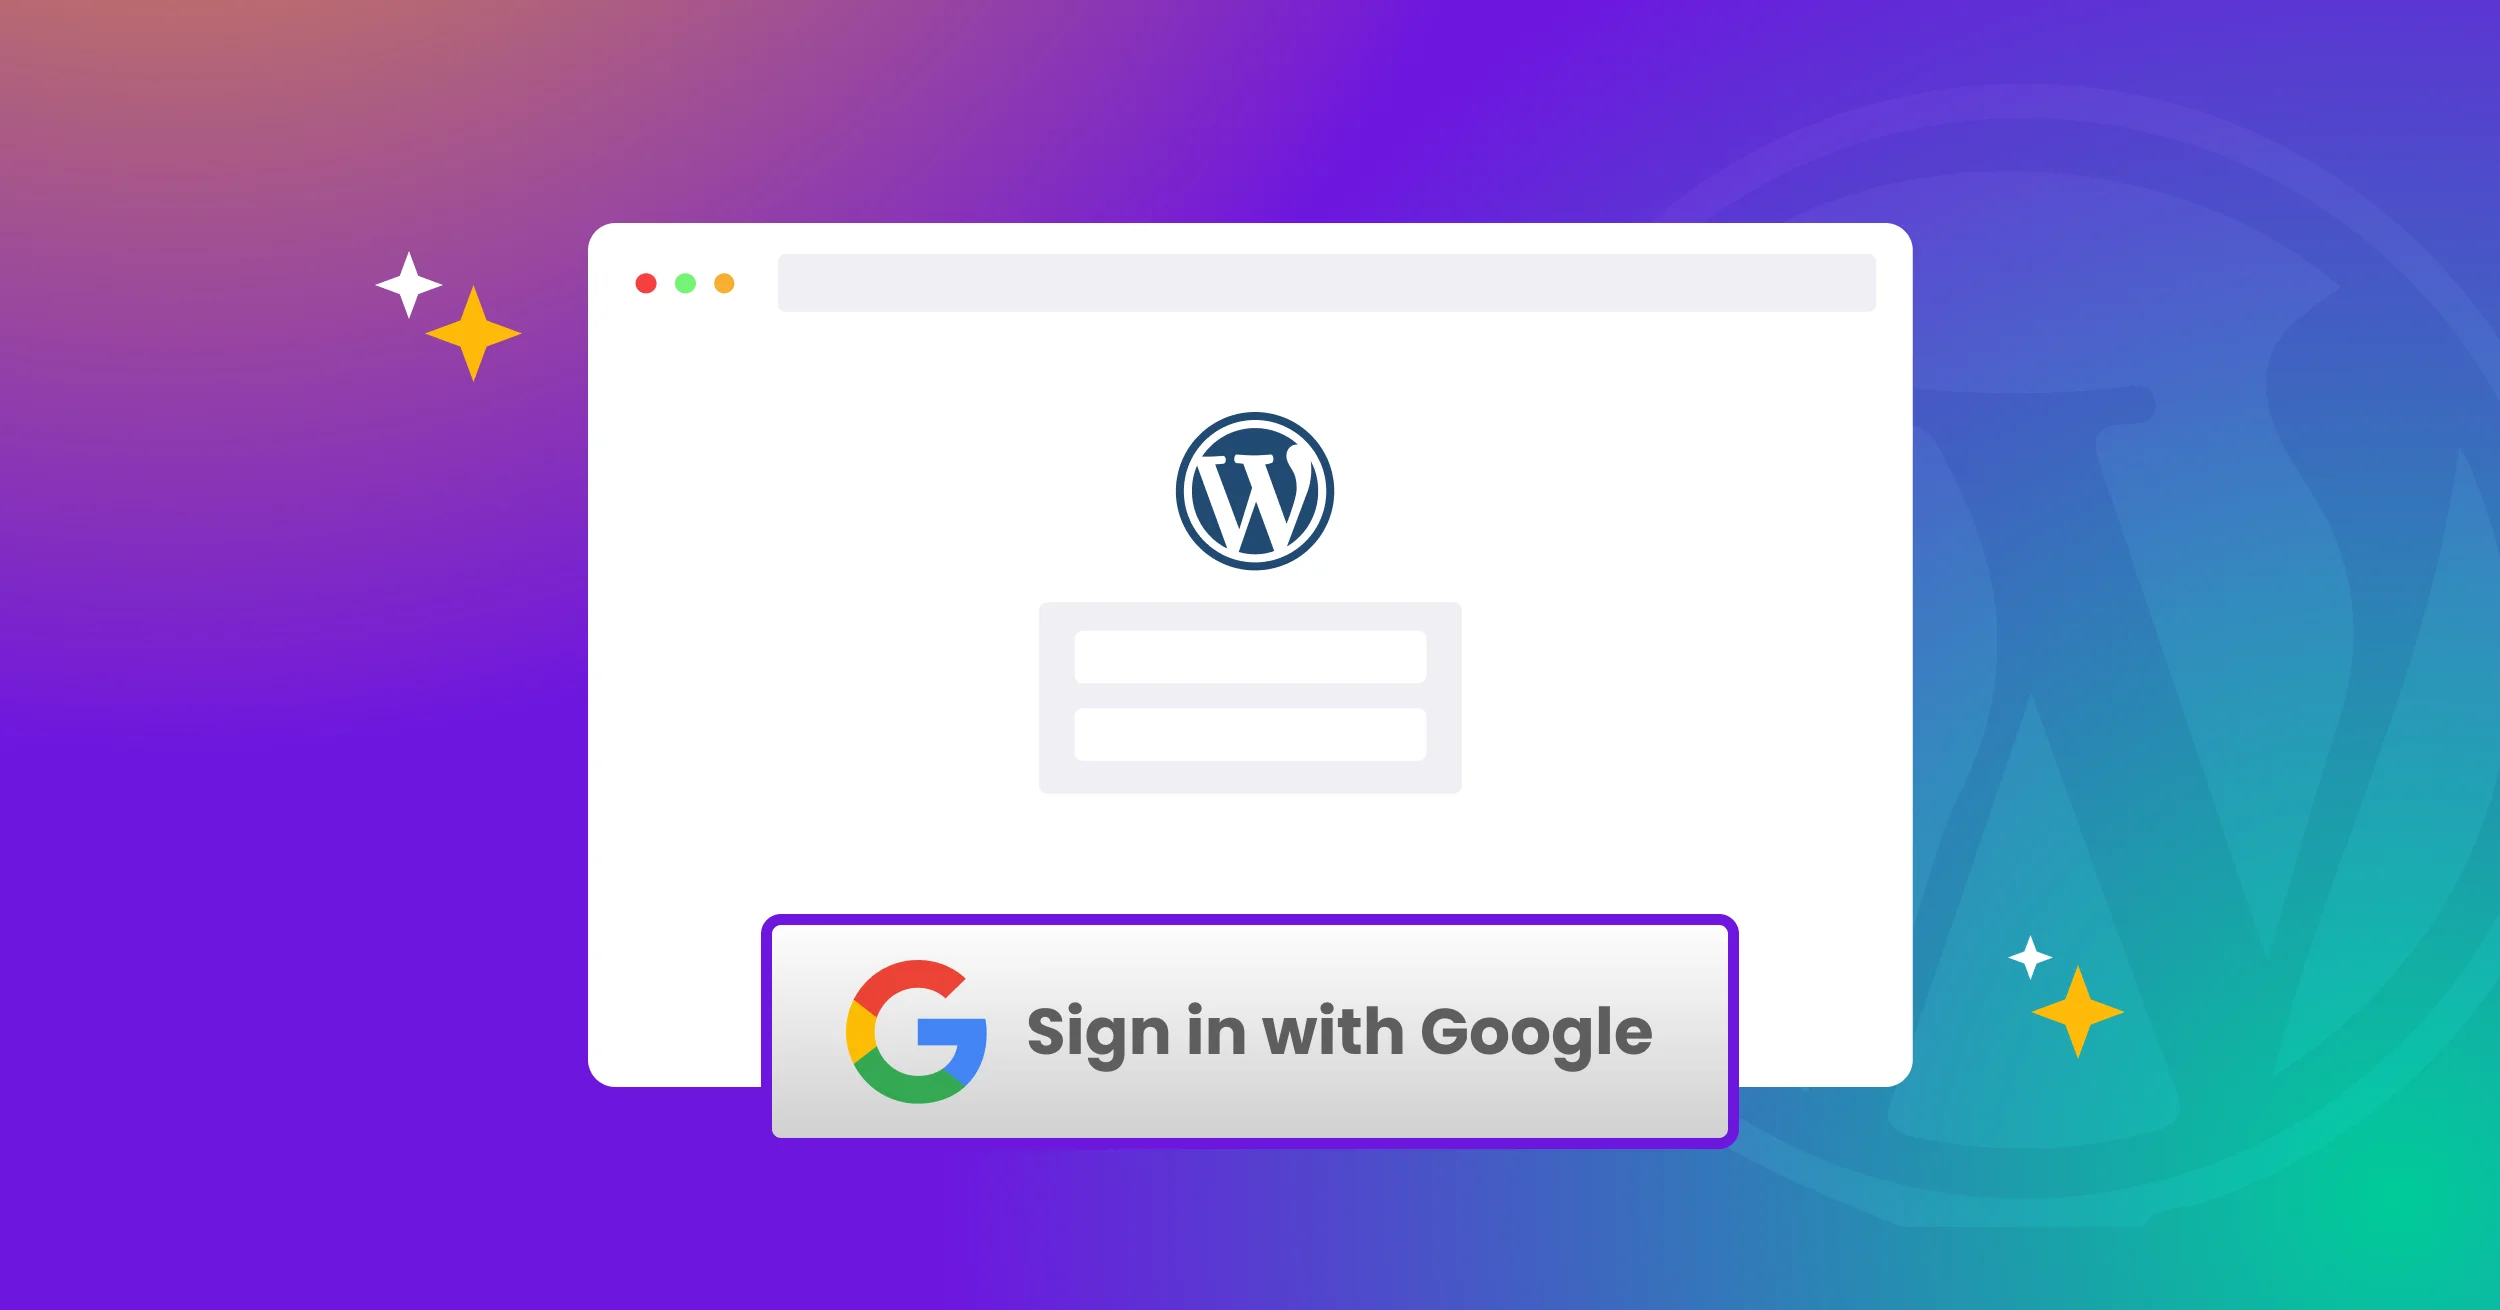
Have you ever noticed how almost every popular app or website now offers a “Login with Google” option? That’s because users love convenience. Instead of creating yet another account and remembering another password, they can sign in with their existing Google account in just one click.
Adding this feature to your WordPress website not only makes logging in faster but also makes your site feel more professional and trustworthy.
The good news? You don’t need to touch a single line of code to set it up. With a WordPress Login Page Plugin, you can easily add a Google login button to your WordPress site in minutes.
In this step-by-step guide, we will walk you through everything you need, from installing the plugin to setting up your Google API credentials and testing the Google login button.
Ready? Let’s get started!
Please note: For this guide, we will utilize the All in One Login plugin to add the Google Login option to a WordPress website. Towards the end of this blog post, we will discuss the plugin in more detail.
Why Add Google Login to WordPress?
Before jumping into the setup, let’s talk about why adding a Google login option is such a big deal for your WordPress site.
- Faster Sign-Up and Login
No one likes filling out long registration forms or trying to remember another password. With Google login, users can create an account or log in instantly with one click. That speed often leads to more sign-ups and fewer abandoned registrations.
- Better Security
Google uses strong authentication and OAuth technology, which means an extra layer of security protects your users’ accounts. Instead of storing yet another password in your database, you rely on Google’s secure login system.
- Fewer Password-Related Issues
Users often forget their passwords. In fact, 51% of users reset forgotten passwords at least once a month. With Google login, they don’t have to manage another set of login details. Simply using their Google accounts, users can log in, reducing login frustration and password reset requests.
- Professional User Experience
Adding social logins, such as Google, makes your site seem more modern and trustworthy. Visitors are already used to the “Sign in with Google” button on apps they use daily, so including it on your site helps build confidence.
What You Need to Enable Google Login in WordPress
To get things started, let’s quickly go over what’s required to add a working Google login button to your site. Don’t worry, it’s not a long list.
- A WordPress Website with Admin Access: You’ll need a self-hosted WordPress site on which you have permission to install plugins.
- All In One Login (AIO Login) Plugin: The free version lets you protect and customize your login page, but for social login features (including Google login), you’ll need the Pro version of AIO Login.
- A Google Cloud Console Account: This is where you’ll generate the API credentials (Client ID and Client Secret) that connect your site with Google.
That’s it! Once you have these three things ready, you can move on to installing the plugin and setting up Google login.
5 Easy Steps to Add a Google Login to a WordPress Website
To simplify the process, we’ll break it down into clear, five actionable steps. Follow along to set up Google login on your WordPress site.
Step 1: Install and Activate All In One Login – Free Version
The first step is to add the All In One Login free plugin to your WordPress site. This gives you the foundation for customizing and securing your login system.
Here’s how to do it:
- Go to the Plugins Page: Log in to your WordPress admin dashboard. From the left-hand menu, click on Plugins > Add Plugin.
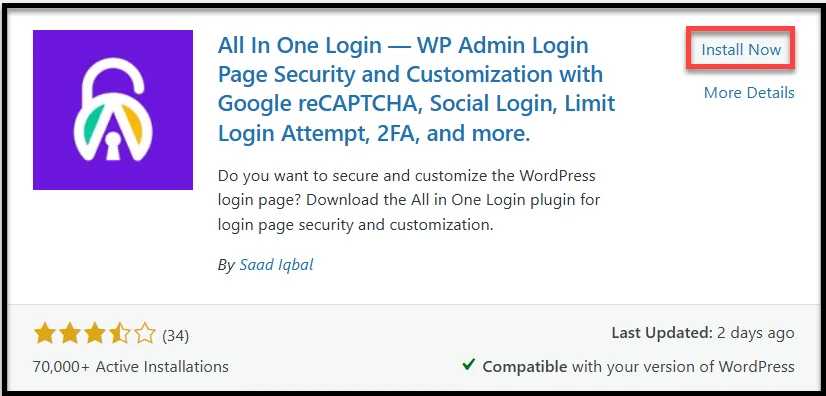
- Search for AIO Login: In the search bar, type ‘All In One Login.’ The plugin should appear in the search results.
- Install the Plugin: Click the ‘Install Now’ button next to All In One Login.
- Activate the Plugin: After installation, click ‘Activate.’ After activation, you’ll see an opt-in option. Simply click on it, and you’ll be redirected to the AIO Login dashboard inside WordPress.

At this point, the free version of AIO Login is running on your site. Next, you’ll upgrade to All In One Login Pro, which unlocks the Google login feature.
Step 2: Install and Activate AIO Login Pro
The free version sets up the basics, but to enable Google login (and other social logins), you’ll need the pro version of the plugin.
To install and activate the pro version, follow the steps below:
1. Download the Pro Plugin
Visit the official website and get a premium plan of your choice. After purchasing, you’ll receive an onboarding email. From there, you can download the plugin in two ways:
- Download from Email: Click the download link in the email you received after purchase.
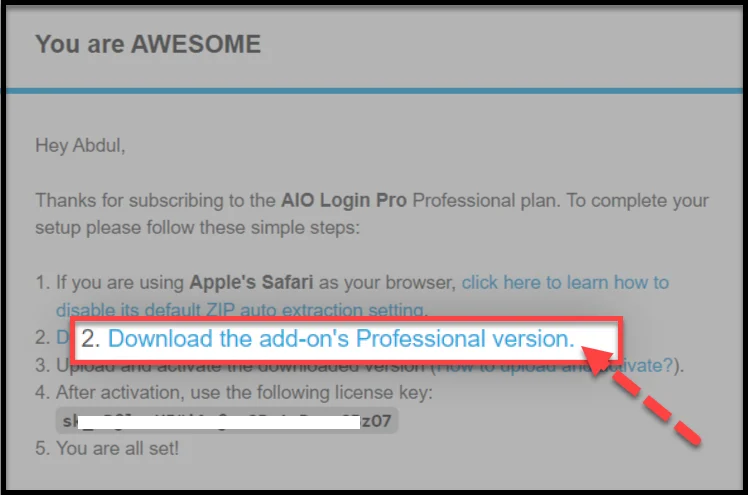
- Download from Your Account: Log in to your account on the plugin’s website, go to the Downloads tab, and grab the Pro zip file.
2. Install the Pro Version
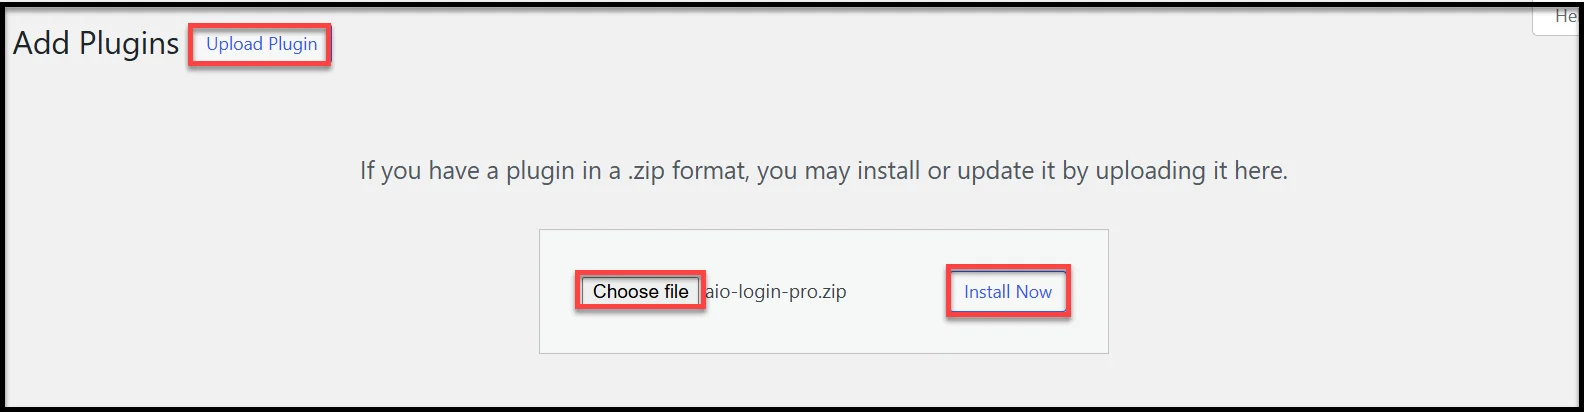
- In your WordPress dashboard, go to Plugins > Add Plugin > Upload Plugin.
- Upload the Pro zip file you just downloaded.
- Click ‘Install Now.’ Once the installation finishes, you will need to activate the plugin.
Important: Make sure the All In One Login’s free version is already installed and active, since the Pro version works alongside it.
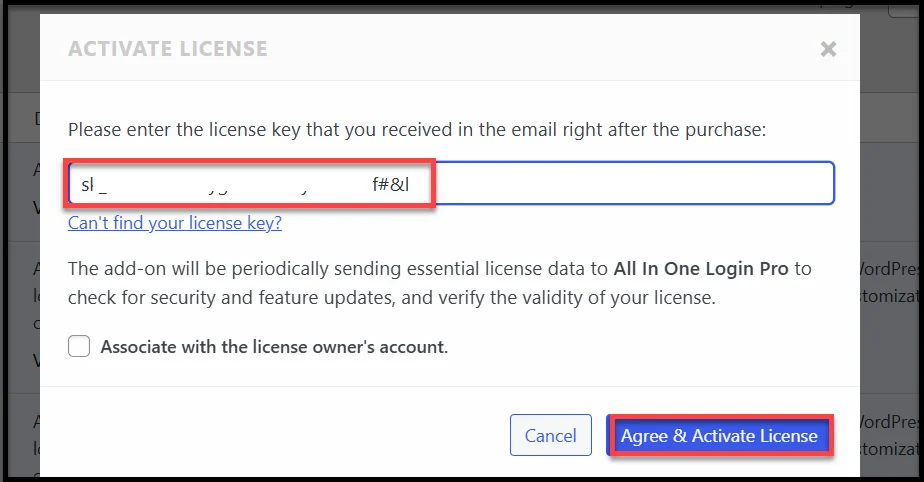
3. Activate Your License
After successful installation, click ‘Activate Plugin’ and you’ll be asked to enter your license key. You’ll find this key in your purchase or onboarding email. Enter it in the license field and click ‘Agree & Activate License.’
Now you’re all set with AIO Login Pro running on your site, and you are ready to configure the Social Login feature (including Google login).
Step 3: Create Google App & Get API Credentials
To connect your WordPress site with Google, you need ‘Client ID and Client Secret.’ These are created inside the Google Cloud Console. It might sound technical, but the process is straightforward if you follow these steps:
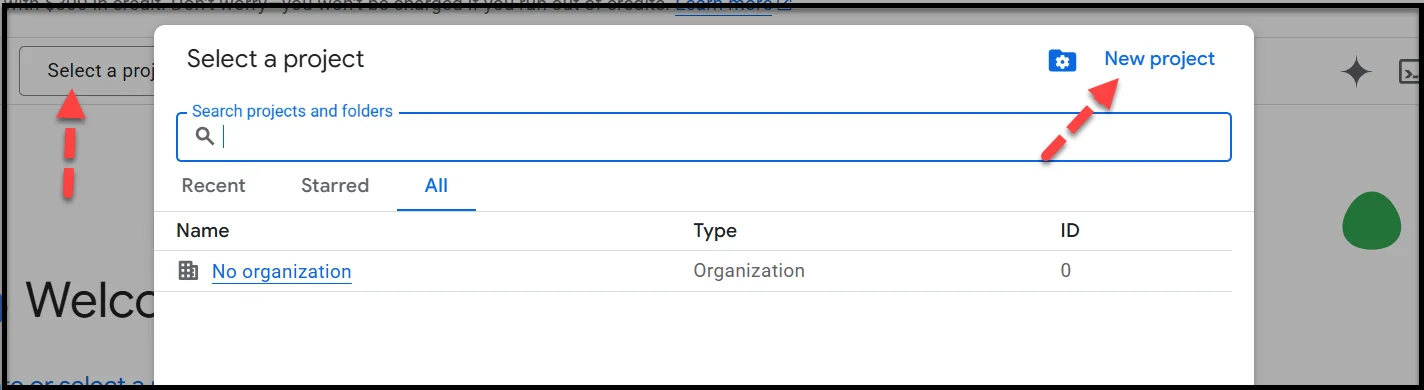
1. Go to Google Cloud Console
Visit console.cloud.google.com and log in with your Google account. Once inside, click the ‘Select a project’ button.
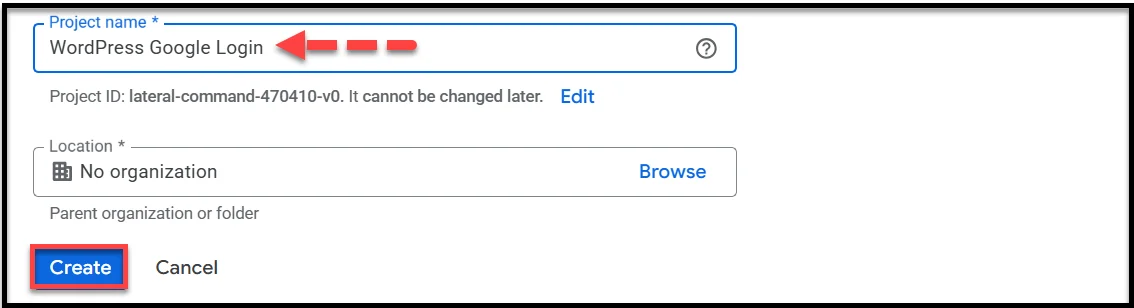
2. Create a New Project
- Click on the ‘New project’ option on the top right.
- In the ‘Project name’ field, type any suitable name you want (e.g., “WordPress Google Login”).
- Next, Click ‘Create.’
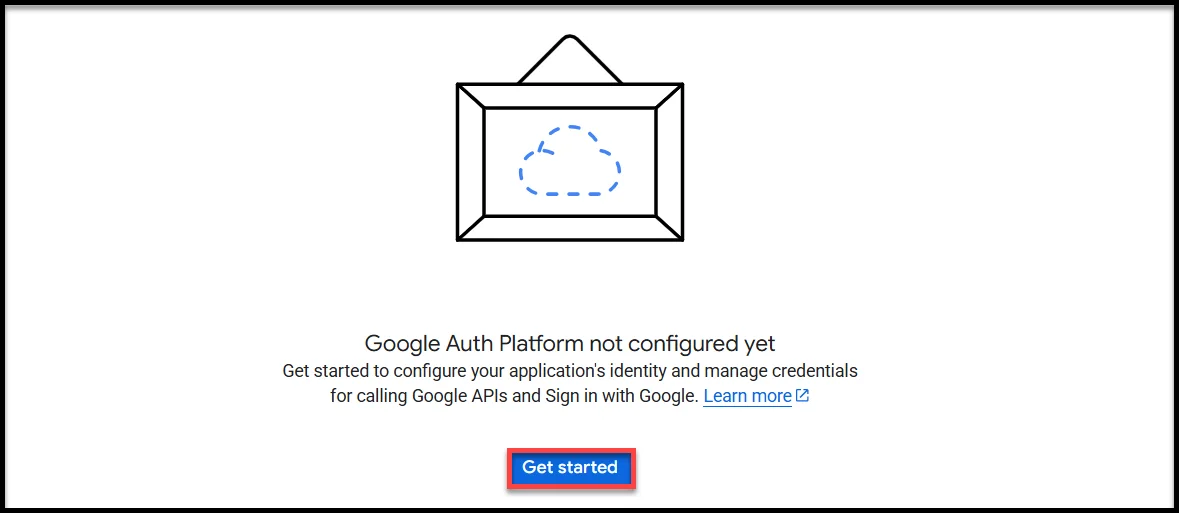
3. Create the App
- In the left menu, click ‘APIs & Services > OAuth consent screen.’

- On the subsequent screen, select your project, and you will see the following ‘Get started’ option to set up your application’s identity and manage credentials
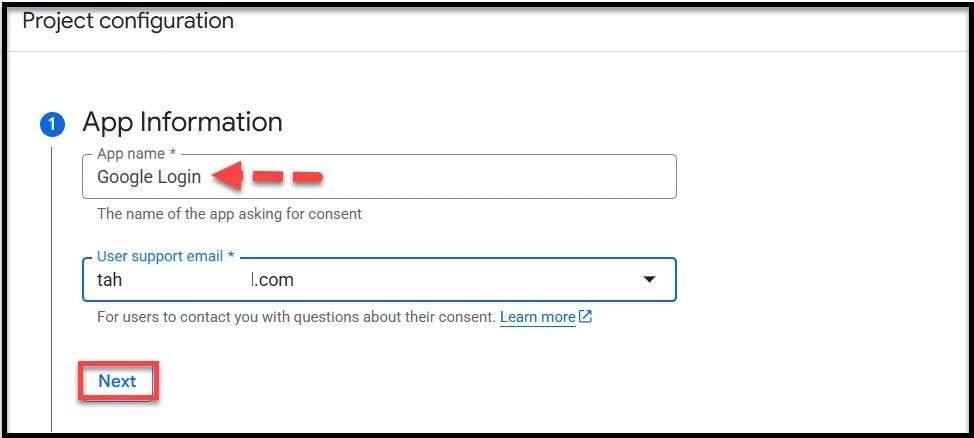
- Enter your app details (app name and support email), and hit ‘Next.’
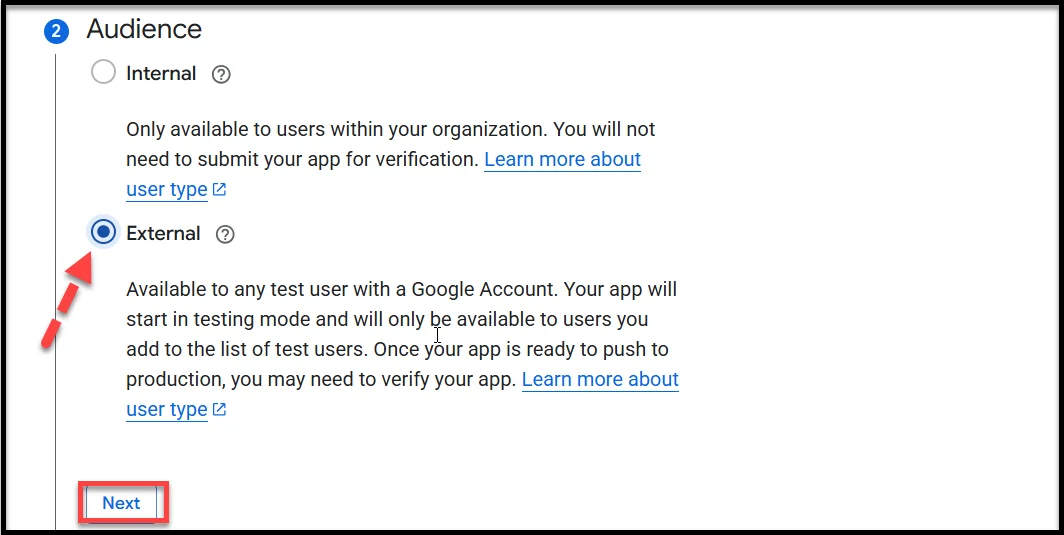
- Select the appropriate audience for your case: Internal or External. For this guide, we are using the external option.
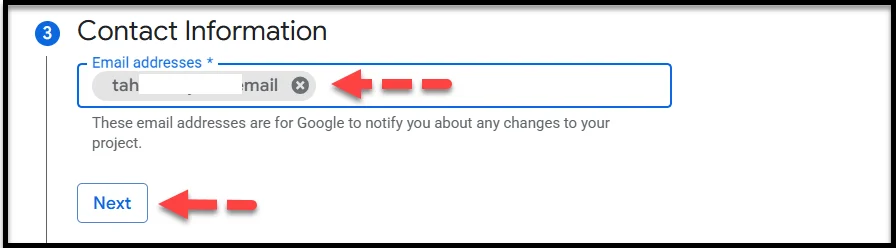
- In the Contact Information field, enter a valid email address so that Google can notify you of changes to the project.
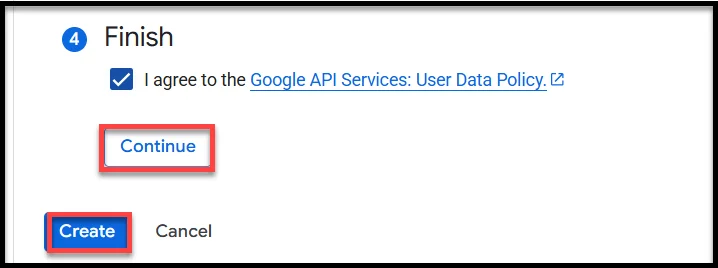
- Finally, check the box saying ‘I agree to the Google API Services: User Data Policy,’ and select ‘Continue’ and ‘Create.’
4. Create OAuth Credentials
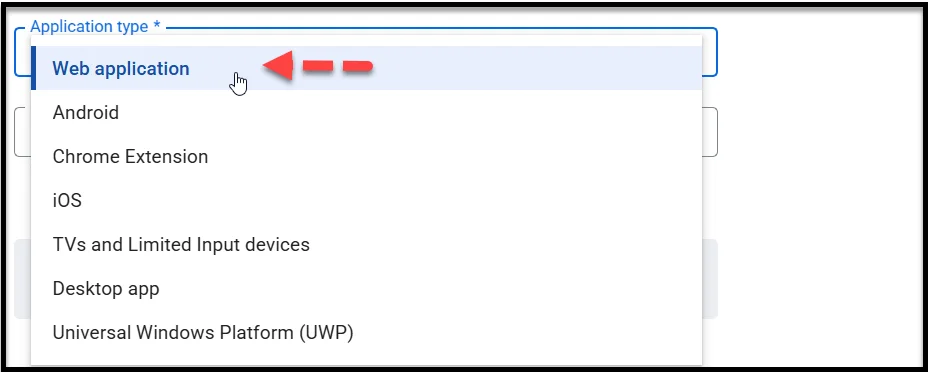
- On the next screen, click ‘Create OAuth client.’

- On the ‘Create OAuth client ID’ page, select ‘Web application’ as the ‘Application type.’
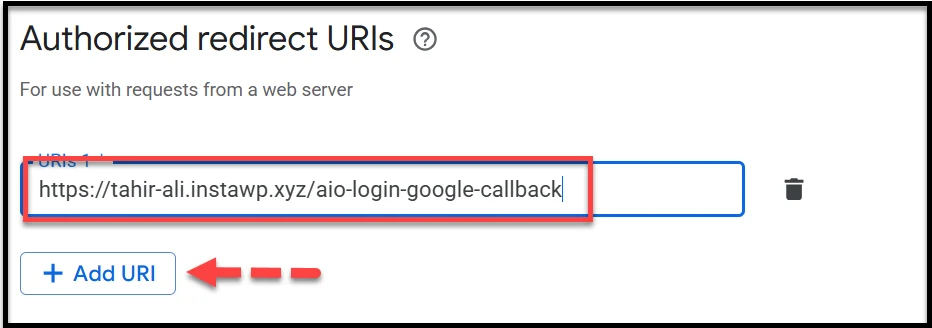
- Scroll down and under Authorized redirect URIs, paste the redirect URL provided in the plugin’s settings and hit ‘+ Add URI’ (you’ll find it inside your WordPress dashboard under AIO Login > Customize > Social Login > Google).
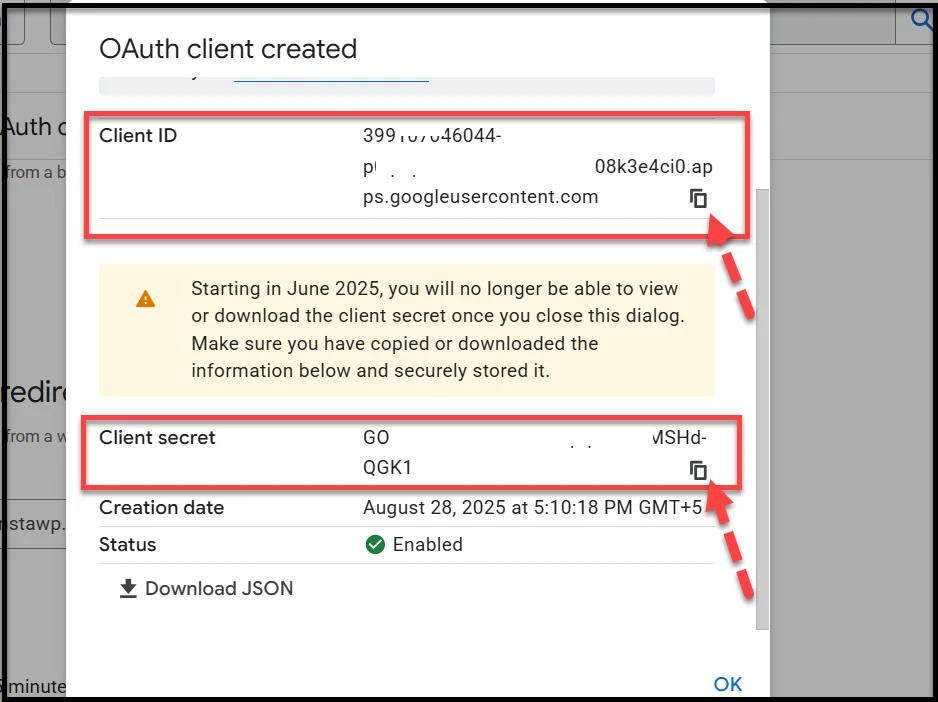
- Finally, select the ‘Create’ button to generate the credentials.

5. Copy Client ID & Client Secret
Once generated, a pop-up will appear, displaying a ‘Client ID and Client Secret.’ Copy both, as you’ll need to paste them into your WordPress site in the next step.
At this point, your Google project is ready, and your WordPress site can now connect to Google’s authentication system.
Step 4: Configure Google Login in AIO Login Plugin
Now that you have your Client ID and Client Secret, it’s time to link them to your WordPress site using the All In One Login premium version.
To set up the Google Login, follow the steps below:
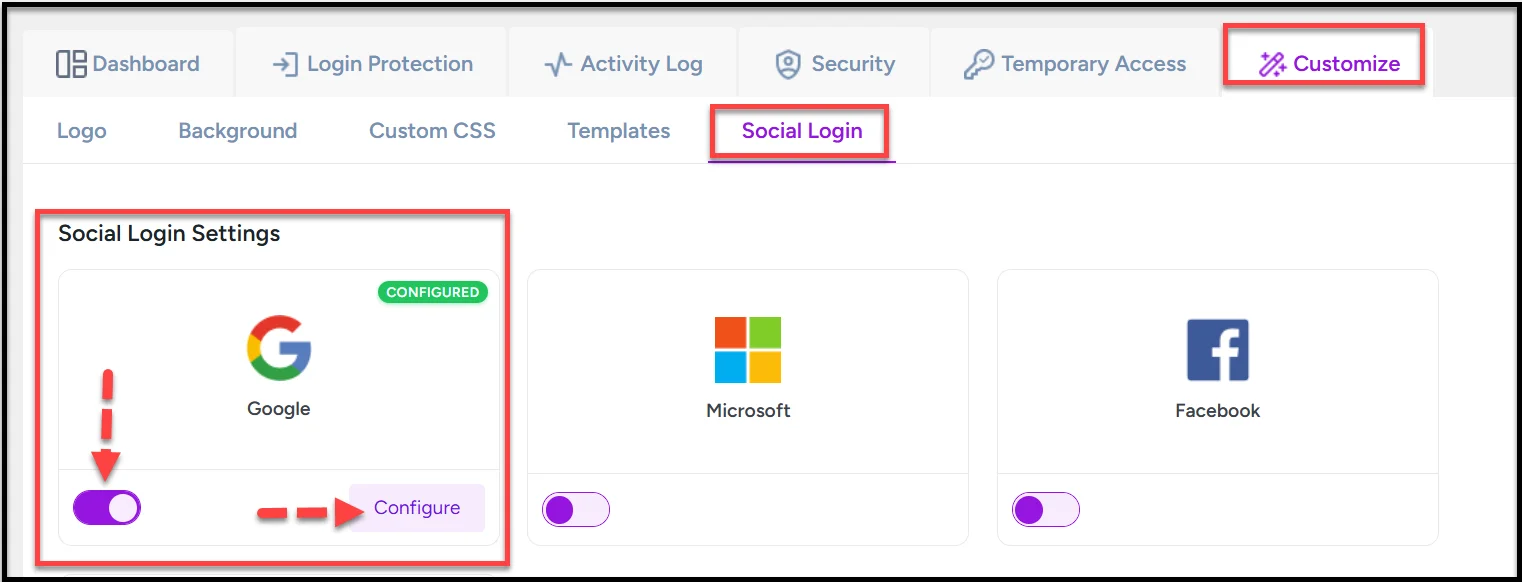
- Open the Plugin’s Settings: In your WordPress dashboard, go to AIO Login > Customize > Social Login.
- Choose Google Login: Toggle on the ‘Google’ social login option and hit ‘Configure.’
- Paste Your Credentials: Click ‘Next’ and enter the ‘Client ID and Client Secret’ you copied from the Google Cloud Console.
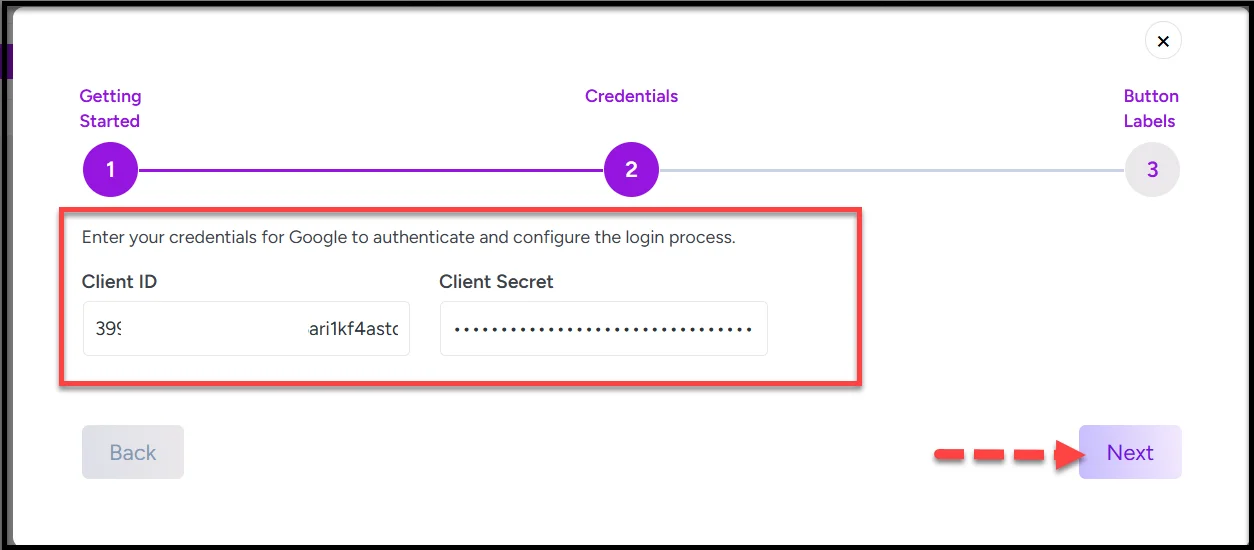
- Now, provide the login and logout label text and hit ‘Finished.’
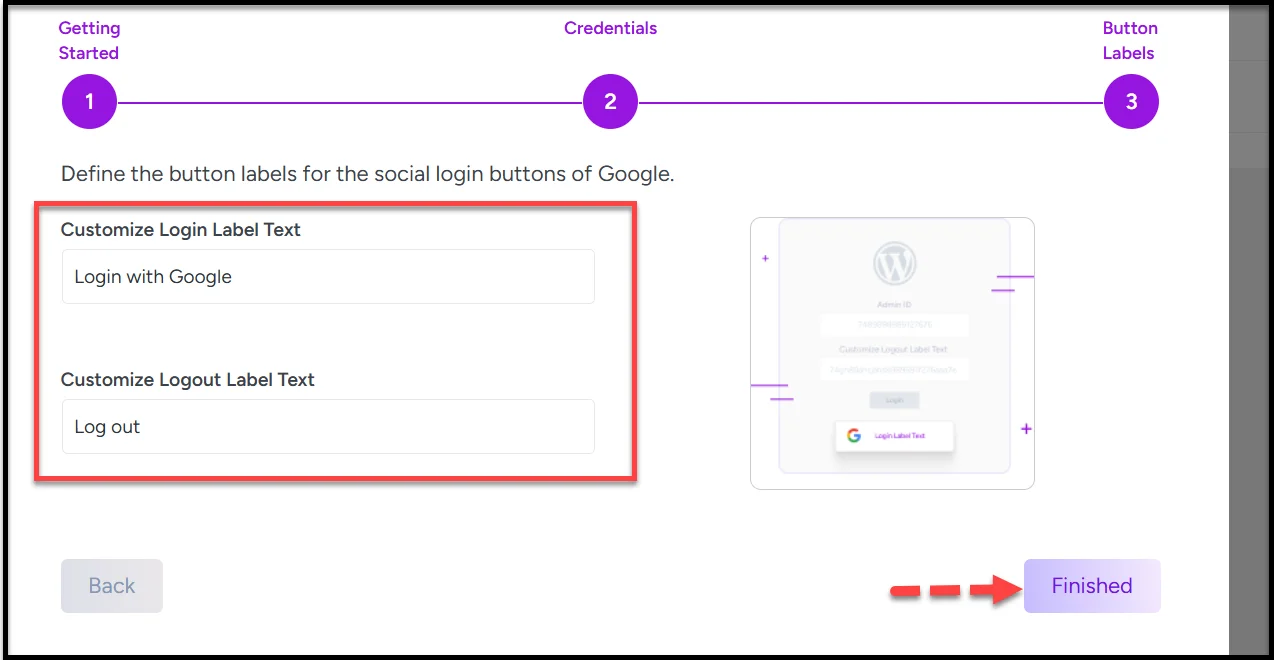
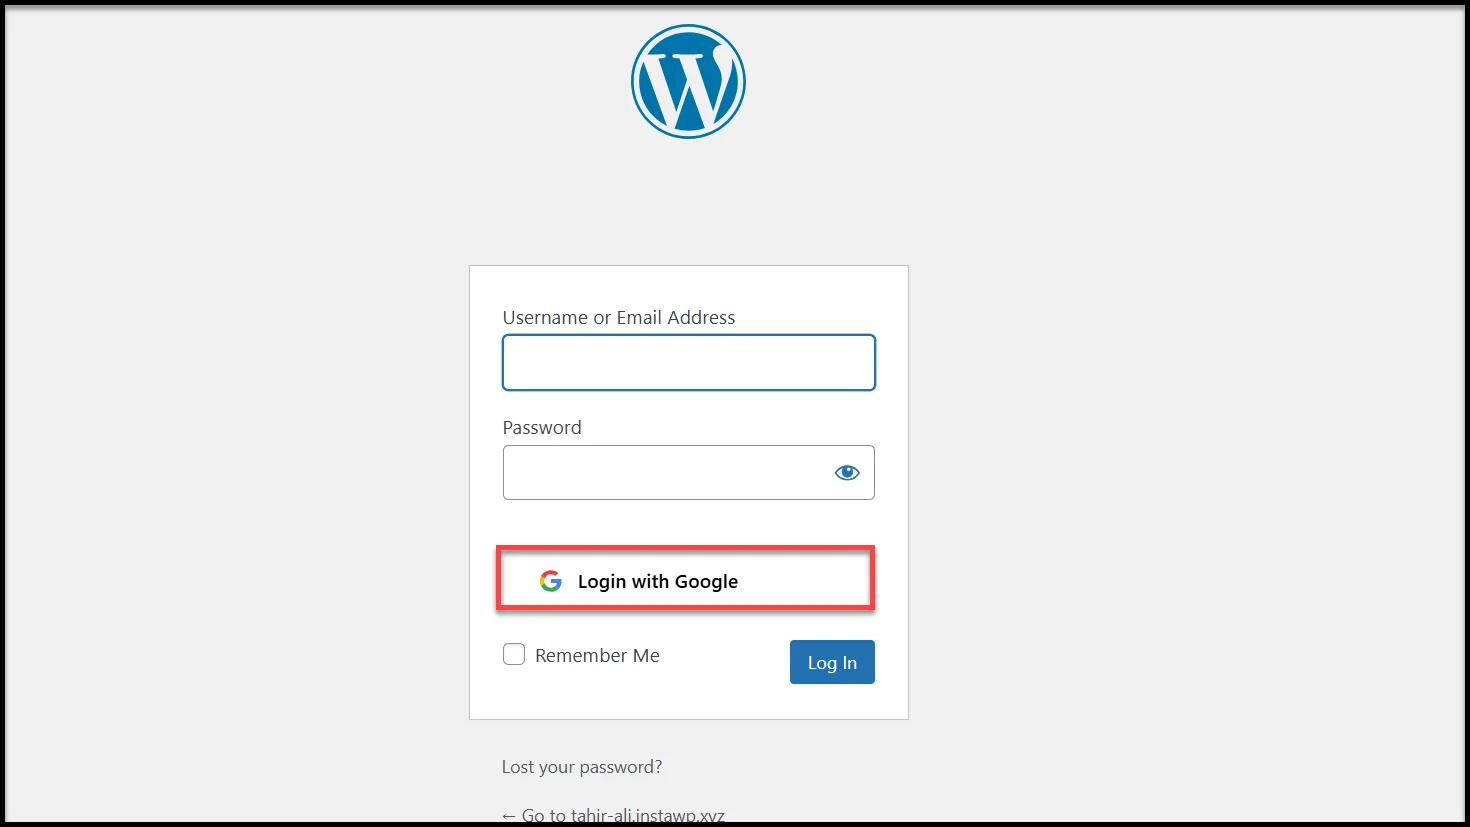
Congratulations! You’ve now successfully added Google Login to your WordPress site. That’s how your login or registration page will show the Google login button. 👇
Other Social Logins You Can Add with All In One Login
While Google login is the most widely used option, the premium version of the plugin also allows you to integrate with other major providers, giving your visitors more flexibility in accessing your site.
Here are the additional platforms you can connect:
- Facebook Login: Perfect for community-driven or social websites where users already spend time on Facebook.
- Microsoft Login: An excellent option for business, education, or enterprise-focused websites where users often log in with their Microsoft accounts.
- LINE Login: A great choice for audiences in Asia, especially Japan, Taiwan, and Thailand, where LINE is one of the most popular communication apps.
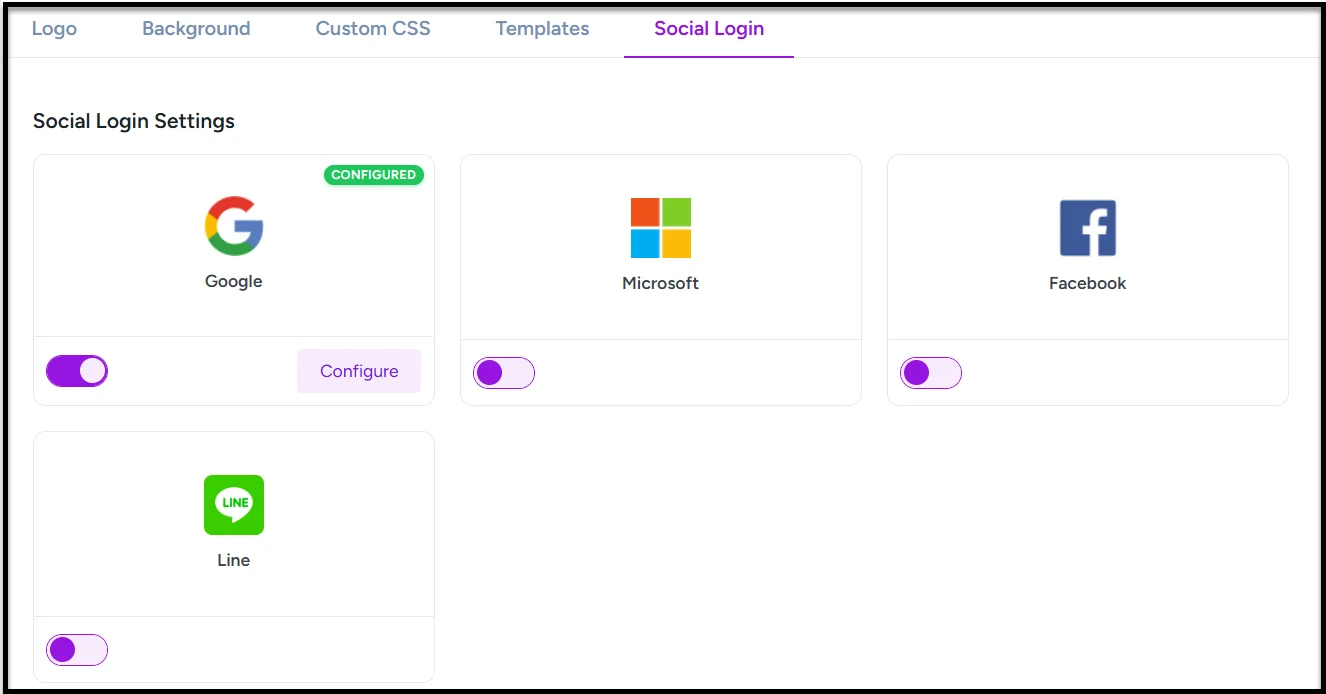
By offering multiple login choices, you make it easier for people to sign in using the account they’re most comfortable with. Some prefer Google, while others might want to use Facebook or Microsoft—with All In One Login, you can support them all without writing a single line of code.
Secure and Customize Your WordPress Login Page with All In One Login Pro
Adding Google login to WordPress is just the beginning. With All In One Login Pro, you’re not only making sign-ins faster and safer but also gaining full control over how your login page looks and works.
Here’s a quick look at what you get:
- Advanced Security: Change admin URLs, enable 2FA, limit login attempts, set temporary access links, and block suspicious users/IPs.
- Social Login Options: Add Google, Facebook, Microsoft, and LINE login for quick, one-click authentication.
- User Protection: Enforce strong passwords, track failed logins, monitor lockouts, and stop brute force attacks with reCAPTCHA.
- Custom Login Design: Replace the default WordPress login page with your own logo, background, styles, and templates from the Customize tab.
With all these features, All In One Login turns your standard WordPress login page into a secure, user-friendly, and fully branded gateway for your website.
👉 Ready to give your users a faster and safer way to log in?Get started with All In One Login Pro today and unlock the power of Google login and more.