


Want to set up a WordPress language selector on your login page?
Good for you because that’s exactly what you will learn in this article.
Creating a WordPress login page with a language selector is essential, especially for businesses catering to audiences from all around the globe.
This article is here to help you with that. Furthermore, you will also learn how you can protect your login page from the deadliest of cyberattacks.
Let’s jump in!
What is a WordPress Language Selector?
The WordPress language selector is usually a drop-down menu, often located at the top of the screen, that allows users to select from multiple languages, streamlining the process for those who are not proficient in English or the default language of your website.
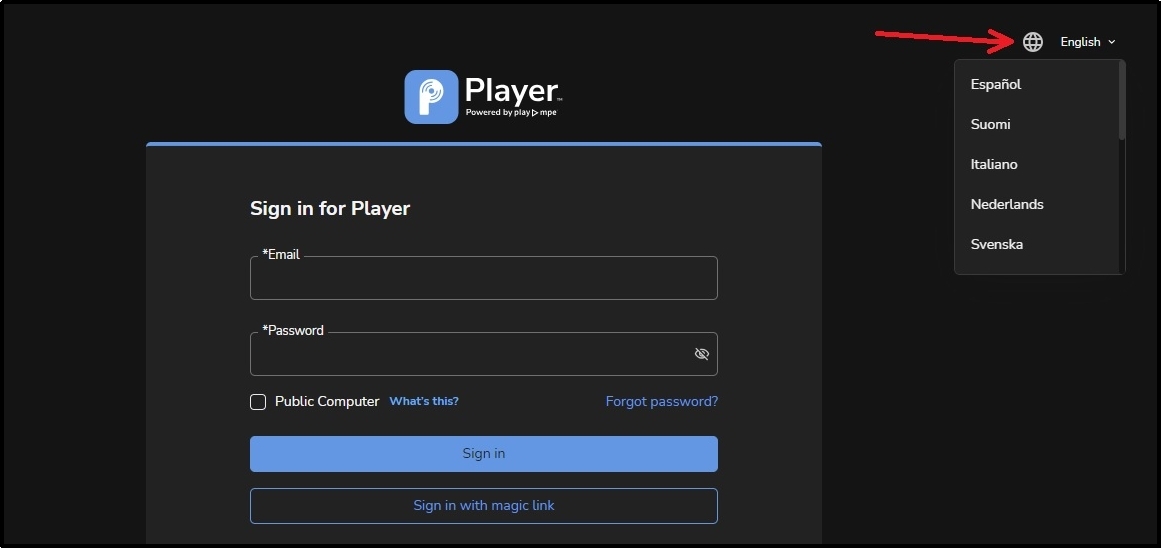
As you can see in the image below, Player MPE’s website offers this captivating WordPress language selector that blends in with their theme and offers tons of languages to change from upon clicking.
Let’s check out a few other examples of language switchers.
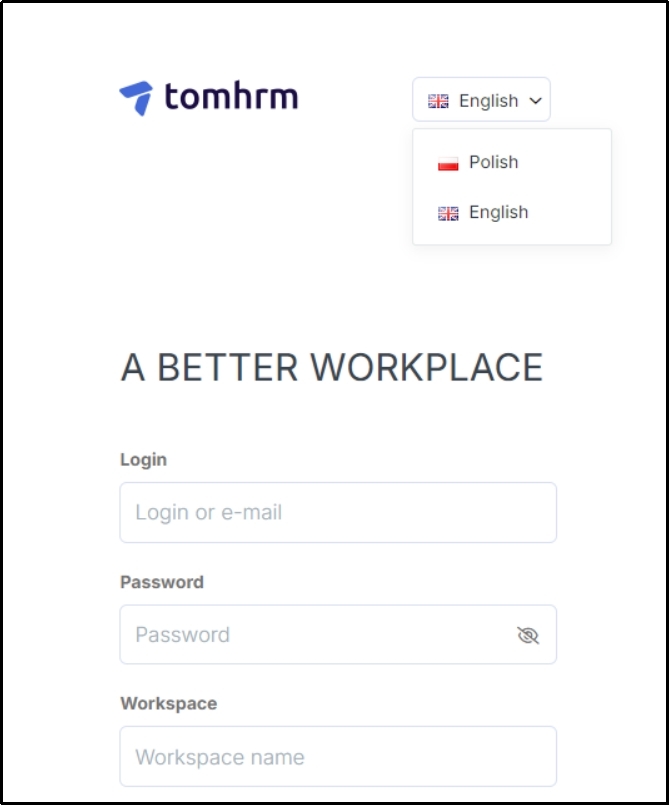
This website, Tomhrm, offers two languages: Polish and English. This accentuates the fact that you don’t have to offer a long list of languages like we saw in the previous example but only a few common ones according to your audience.
Why Add a WordPress Language Selector on The Login Page?
Now that you understand what a WordPress language selector is, you might be wondering how adding this feature can be helpful for your brand and business.
Having a website available in multiple languages is a fantastic way to connect with a broader audience. Not only can it lead to more conversions and sales, but it also enhances your SEO and strengthens how people see your brand.
In fact, research suggests that multilingual websites can reach 75% more internet users, especially those who don’t speak English as their primary language. Another fact states that from 7.8 billion inhabitants worldwide, only 1.35 billion speak English. Of those 1.35 billion, only 360 million people speak it as their first language. This causes monolingual websites to miss out on tons of traffic.
MrBeast, the biggest YouTube channel in the world, reports monitoring significant growth after switching to a multilingual approach. In fact, he even opened separate channels for specific languages.
Moreover, a multilingual login page also offers a comprehensive advantage over your competitors without putting in extra effort. Not to mention the customer satisfaction.
Enough with the why. Now, let’s jump into the how!
Set up a Language Selector on the WordPress Login Page: 03 Easy Steps
Fortunately, WordPress has a built-in feature to enable the WordPress language selector on the login page. It provides a wide selection of 65 languages and over 160 translations. However, you must note that the changes will not affect the content of the website, only the login and register forms.
⚠️ Your website’s content needs to be in the chosen language. Additionally, altering your default language will result in the loss of all prior translations.
Ready? Let’s start!
Step 1. Enter WordPress Settings
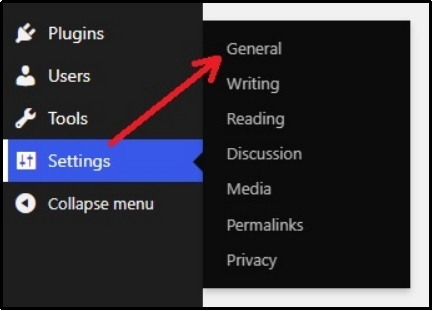
First and foremost, enter your WordPress by putting in login credentials. Once there, navigate to Settings ⇒ General.
Step 2. Install Languages
Now, let’s install languages. To do so, scroll down until you see this language selector.

Use the drop-down arrow to reveal all the languages, and click on the one you want to install.
Once done, use the Save Changes button to save your progress.
Repeat the process with as many languages as you want.
Step 3. Test the WordPress Language Selector
The work is done! Let’s check it on the front end. Log in to your WordPress by adding /wp-login.php or /wp-admin ahead of your domain name (more on this later).
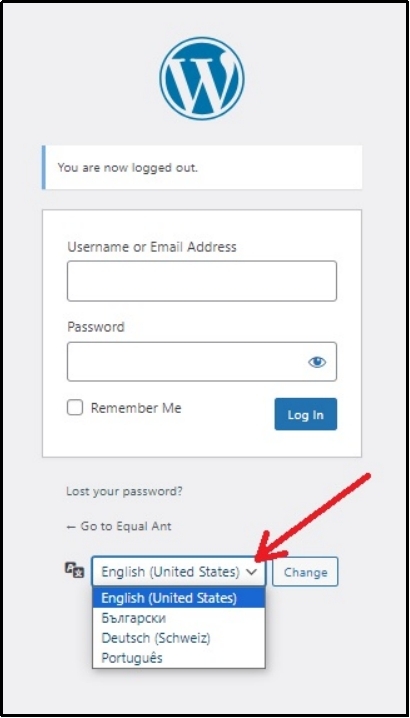
That will take you to the login screen, and you can clearly see the WordPress language selector there. Click on it to reveal all the languages we downloaded in the previous step.
There you go! If you want to customize a multilingual login page, this guide can help: How to Customize A WordPress Multilingual Login Page
Protect Your Login Page From Cyberattacks
Previously, we discussed adding /wp-login.php/ ahead of your domain to land on the login screen of WordPress. While this is a straightforward and quick way, this can be pretty straightforward for hackers as well.
Cyberattackers use a deadly cyberattack called a brute force attack that uses automated machines that try millions of password combinations in seconds, which can be even more problematic for businesses that use weaker passwords.
There are multiple kinds of brute force attacks. Some are often combined with other cyberattacks, such as phishing to extract sensitive information from the victim, which enhances the chance of success for these attacks.
Thus, concealing your login page URL is essential.
Fortunately, you can easily do that with All-in-One Login: a WordPress plugin loved by users for its ease of use and clean interface.
Go to the WordPress plugin directory and install the All-in-One Login plugin. Once installed, activate to right away and navigate to the plugin’s settings.

Go to Login Protection tab ⇒ Change Login URL subtab.

You will see an input box titled Login URL. Enter your new login address in the input box and save changes.
Remember:
- Ensure the updated login URL is not easy-guessable.
- Avoid using common words, such as admin, login, mylogin, etc.
- Enhance security with a strong password after masking your IP. Always use a strong password that includes a mix of upper and lower-case letters, numbers, and special characters.
You can always enhance security further by implementing 2FA, limit login attempts, or using reCAPTCHA. Limiting login attempts and 2FA prevents brute force and other password-guessing attacks, and reCAPTCHA helps keep bot logins away.
Fortunately, All-in-One Login offers these two features as well. Follow the guides below for documentation:
- How to Add CAPTCHA to WordPress Login in 03 Easy Steps
- How to Set Up Two-Factor Authentication (2FA) for WordPress [3 Easy Steps]
- How to Implement WordPress Limit Login Attempts [3 Easy Steps]
Install All-in-One Login now and say goodbye to unprotected login pages!
Conclusion
Setting up a WordPress language selector on your login page is a simple yet effective way to improve user experience, broaden your global reach, and enhance the accessibility of your website.
Additionally, securing your login page from potential cyberattacks, like brute force attempts, ensures that your website remains safe from unauthorized access.
By following the steps outlined and using the All-in-One Login plugin, you can easily implement a multilingual login experience that is also safe from cyber threats. Taking these measures will not only enhance your website’s functionality but also build trust and satisfaction among your users, ultimately benefiting your business in the long run.
Frequently Asked Questions
What is a WordPress language selector, and why should I add it to my login page?
A WordPress language selector is a drop-down menu that allows users to choose from multiple languages on your website, improving accessibility for a global audience. Adding it to your login page helps users switch to their preferred language.
Can I add multiple languages to my WordPress login page?
Yes, WordPress allows you to add multiple languages to your login page. You can install up to 65 languages and over 160 translations using WordPress’s built-in feature.
What languages should I include in the dropdown language selector?
Enable languages that suit your target audience. For instance, if you cater to an audience from specific country, you can add a couple of the most used languages in that specific country or area.